

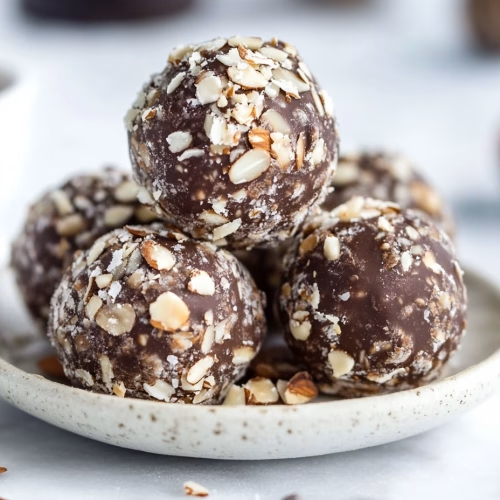
Looking for a quick, healthy snack that feels like a treat? I’ve got you covered! My Almond Joy Energy Bites are the perfect blend of sweet and nutritious. They’re easy to make, require no baking, and are packed with wholesome ingredients you probably already have in your pantry.
These little bites are crafted for busy home bakers who want something delicious on the go. With just 10 minutes of prep time, you can whip up a batch that’s perfect for snacking, gifting, or even satisfying a sweet tooth. The mix of almond butter, oats, and shredded coconut creates a dessert-like flavor while keeping things healthy.
What makes this recipe stand out? It’s all about balance. Each bite combines the rich taste of chocolate with the natural sweetness of honey and the crunch of almonds. Plus, they’re easy to store—pop them in the fridge or freezer for a grab-and-go snack anytime.
Ready to get started? Let’s dive into this simple, satisfying recipe that’s sure to become a favorite. Check out more easy vegan candy recipes for more inspiration!
Almond Joy Energy Bites
Equipment
- Spatula for mixing ingredients
- Baking sheet lined with parchment paper
- Refrigerator for chilling bites
Ingredients
- 1 cup rolled oats
- 0.5 cup almond butter or peanut butter
- 0.5 cup shredded coconut unsweetened
- 0.25 cup mini chocolate chips semi-sweet or dark
- 0.25 cup honey or maple syrup
- 1 tsp vanilla extract
- 0.25 cup chopped almonds for added crunch
Instructions
- In a mixing bowl, combine rolled oats, almond butter, shredded coconut, mini chocolate chips, honey, vanilla extract, and chopped almonds. Stir until well combined.
- Use a spoon or your hands to roll the mixture into small, bite-sized balls and place them on a parchment-lined baking sheet.
- Refrigerate for at least 30 minutes to allow the bites to firm up.
- Enjoy immediately or store in an airtight container in the refrigerator for up to 1 week.
Notes
- Optional Equipment: A food processor can be used for a smoother texture.
- Customization: Swap almond butter for cashew or peanut butter.
- Storage: Keep in an airtight container in the fridge for up to a week.
- Serving Tip: Let sit at room temperature for a few minutes before eating for a softer texture.
Nutrition
Introduction to Almond Joy Energy Bites
Craving a snack that’s both indulgent and nutritious? I’ve got you covered! My journey to creating these bites started with a love for the classic candy bar. I wanted to reinvent it into something healthier—without sacrificing the joy of its flavor. The result? A modern twist that’s perfect for today’s busy lifestyles.
A Modern Twist on a Classic Treat
These bites are a creative spin on the beloved candy bar. By swapping refined sugars for natural sweeteners like Medjool dates, I’ve made them healthier without compromising on taste. The combination of almond butter, chocolate, and shredded coconut creates a perfect balance of flavors. It’s a treat that feels indulgent but fuels your day with quality protein and healthy fats.
Perfect On-the-Go Energy Boost
Whether you need a quick breakfast, a post-workout snack, or a sweet pick-me-up, these bites are ideal. They’re easy to make—just toss the ingredients into a food processor, mix, and roll into balls. In under 15 minutes, you’ll have a batch ready to go. Store them in the fridge or freezer for a grab-and-go option that’s always within reach.
| Nutritional Information (Per Bite) | Amount |
|---|---|
| Calories | 147 kcal |
| Protein | 5 g |
| Fat | 9 g |
| Carbohydrates | 14 g |
| Fiber | 2 g |
Looking for more snack inspiration? Check out these must-try cookie trends for 2025 to elevate your baking game!
Ingredients and Nutritional Breakdown
Want a treat that’s as wholesome as it is delicious? Let’s dive into the key components that make these bites a standout snack. Each ingredient plays a role in creating the perfect balance of flavor and nutrition.
Essential Components and Pantry Staples
This recipe relies on simple, pantry-friendly items. You’ll need 2/3 cup almond butter (or creamy peanut butter), 3/4 cup old-fashioned oats, and 1/4 cup semi-sweet chocolate chips. For added texture, I use 1/4 cup roughly chopped almonds and 1/4 cup unsweetened shredded coconut. To boost the nutritional profile, I include 1/2 cup ground flax seed and 2 tbsp honey for natural sweetness.
These ingredients are easy to find and come together in a well-balanced mixture. If you’re out of honey, try agave or maple syrup as a substitute. The shredded coconut adds a tropical touch, while the almond butter provides a creamy base. It’s a versatile recipe that’s perfect for customizing to your taste.
Calorie and Macro Information per Bite
Each bite is packed with nutrients to keep you fueled. Here’s a breakdown of the nutrition per serving:
| Nutritional Information (Per Bite) | Amount |
|---|---|
| Calories | 200 kcal |
| Protein | 5 g |
| Fat | 12 g |
| Carbohydrates | 16 g |
| Fiber | 3 g |
These bites are calorie-dense but nutrient-rich, making them an ideal snack for pre- or post-workout. The protein and fiber from the flax seed and almonds keep you full and satisfied. For more healthy treats, check out these sweet potato brownies—they’re just as delicious and nutritious!
Step-by-Step Preparation Guide
Ready to whip up a snack that’s both tasty and simple? Let’s walk through the process step by step. I’ll guide you through mixing, chilling, and rolling to create the perfect texture for your treats.
Mixing and Chilling for Better Consistency
Start by adding all your ingredients into a food processor. This ensures everything blends smoothly into a uniform mixture. If you don’t have a processor, a large bowl and a bit of elbow grease will work too!
Once combined, transfer the mixture to a container and pop it in the fridge. Chilling for 15-30 minutes makes it easier to handle and helps the flavors meld together. Trust me, this step is worth every minute!
Rolling into Perfect Bites or Bars
After chilling, it’s time to shape your treats. Use a cookie scoop or your hands to roll the mixture into small balls. If the mixture feels dry, wet your hands or add a splash of water to help bind it.
For a fun twist, press the mixture into a pan and cut it into bars. Whether you choose balls or bars, the result is a delicious, protein-packed snack that’s perfect for any time of day.
Store your creations in the freezer for a quick grab-and-go option. They’ll stay fresh and ready to enjoy whenever you need a boost!
Customized Variations and Flavor Enhancements
Ready to take your snack game to the next level? One of the best things about this treat is how easy it is to customize. Whether you’re swapping ingredients or adding mix-ins, you can create a version that’s uniquely yours.
Ingredient Substitutions and Mix-In Options
Don’t have almond butter on hand? No problem! Try cashew butter or tahini for a creamy base. For a nut-free option, sunflower seed butter works wonders. If you’re out of shredded coconut, swap in chopped nuts or seeds for a crunchy twist.
Want to boost the flavor? Add dried cranberries, walnuts, or dark chocolate chunks. These mix-ins not only enhance the taste but also add extra texture. Pro tip: Balance wet and dry ingredients to keep the mixture easy to handle.
Incorporating Medjool Dates for Natural Sweetness
Medjool dates are a game-changer in this recipe. They’re a natural sweetener that replaces refined sugars, making the bites healthier without sacrificing flavor. Plus, they help bind the mixture together, so you can roll perfect balls every time.
If you’re new to using dates, soak them in warm water for 10 minutes to soften. Then, blend them into a paste before mixing with other ingredients. This step ensures a smooth, even texture.
“Small tweaks to ingredients can result in entirely new flavor profiles while keeping the snack healthy.”
Experiment with these variations to find your favorite combination. And don’t forget to share your creations—I’d love to hear how you’ve made this recipe your own! For more guilt-free dessert ideas, check out these 12 guilt-free desserts for a healthier.
Almond Joy Energy Bites recipe: Expert Techniques
Want to master the art of creating the perfect snack? I’m here to share my expert techniques for achieving the ideal texture and consistency in your homemade treats. These tips will help you craft energy balls that are not only delicious but also hold together perfectly.
Optimizing Texture and Binding the Mixture
The key to success lies in processing your ingredients for the right amount of time. I recommend blending everything in a food processor for 2-3 minutes. This creates a sticky, cohesive mixture that’s easy to roll into balls.
If your mixture feels too crumbly, don’t worry! A splash of water or an extra tablespoon of butter can work wonders. These small adjustments ensure every ball holds its shape beautifully.
For a smooth texture, monitor the binding agents like butter and how they interact with dry ingredients. Adding a dash of cocoa powder or extra flavor can elevate the taste while maintaining the perfect consistency.
“The right processing time and binding agents are the secrets to flawless energy balls.”
Experiment with blending times and ingredient ratios to find what works best for you. These techniques will take your snack-making skills to the next level. For more inspiration, check out this pistachio shot recipe—it’s another quick and delicious treat!
Serving Suggestions and Storage Options
Need a snack that’s both convenient and satisfying? I’ve got you covered! These homemade treats are perfect for meal prep, workouts, or quick snacks. Let’s dive into the best ways to serve and store them to keep them fresh and delicious.
Meal Prep Ideas for Workouts and Quick Snacks
These snacks are a lifesaver for busy days. Pair them with a smoothie or coffee for a quick breakfast. They’re also great for post-workout fuel, thanks to their protein and healthy fats. Portion them into small containers for a week’s supply or grab them straight from the fridge for an on-the-go option.
For a fun twist, serve them as part of a snack plate with fresh fruit or nuts. You can even roll them into balls or press them into bars for variety. Experiment with different presentations to suit your mood or occasion.
Practical Storage Tips
To keep your snacks fresh, store them in an airtight container. They’ll last up to a week in the refrigerator or up to three months in the freezer. If you’re in a humid climate, adjust storage methods to maintain the perfect texture.
Here’s a quick guide to storage durations:
| Storage Method | Duration |
|---|---|
| Refrigerator | Up to 1 week |
| Freezer | Up to 3 months |
Careful storage ensures every bite stays flavorful and nutritious. For more guilt-free dessert ideas, check out these guilt-free WW desserts to satisfy your sweet tooth!
Fuel Your Day the Sweet Way with These Almond Joy Energy Bites
Creating these delightful treats has been such a rewarding experience! With their perfect blend of chocolate, coconut, and protein-rich ingredients, they’re a modern twist on a classic favorite. Whether you enjoy them as a dessert, snack, or post-workout boost, they’re sure to satisfy.
Following the simple steps and tips shared here ensures consistent, delicious results every time. The mixture comes together quickly in a food processor, and rolling them into balls is a breeze. Store them in an airtight container in the fridge or freezer for lasting freshness.
Thank you for joining me on this culinary journey! I hope you feel inspired to try this recipe and make it your own. Share your creations and variations—I’d love to hear how you’ve put your unique spin on it. For more sweet ideas, check out this hazelnut candy recipe—it’s another quick and indulgent treat!
Happy baking, and enjoy every joyful bite!
FAQ
Can I use a different nut butter instead of almond butter?
Absolutely! Peanut butter, cashew butter, or sunflower seed butter work great as substitutes. Just make sure they’re creamy and unsweetened for the best texture.
How long do these bites stay fresh?
When stored in an airtight container in the fridge, they’ll stay fresh for up to two weeks. You can also freeze them for up to three months for longer storage.
Can I make these bites sugar-free?
Yes! Use unsweetened shredded coconut and opt for natural sweeteners like Medjool dates or a touch of stevia to keep them sugar-free and still delicious.
What’s the best way to roll the mixture into balls?
Wet your hands slightly before rolling to prevent sticking. Scoop about a tablespoon of the mixture, then gently roll it between your palms for smooth, even bites.
Can I add protein powder to this recipe?
Definitely! Add a scoop of your favorite protein powder to the mixture for an extra boost. Just adjust the liquid ingredients if needed to maintain the right consistency.
Are these bites gluten-free?
Yes, as long as you use gluten-free ingredients like certified gluten-free oats and ensure your cocoa powder is free from cross-contamination, these bites are gluten-free.
Can I turn these into bars instead of bites?
Absolutely! Press the mixture into a lined baking dish, chill until firm, and then cut into bars for a convenient on-the-go snack.
My kids helped make this and had so much fun.