

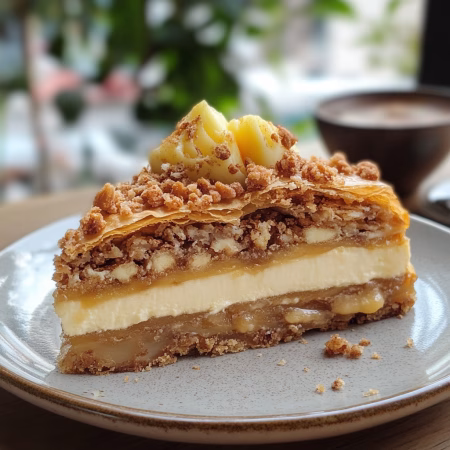
Imagine a dessert that combines the best of two worlds—creamy richness and crispy, flaky layers. That’s exactly what this baklava cheesecake fusion brings to the table. It’s a show-stopping treat that’s perfect for impressing family and friends or simply indulging in something extraordinary.
This recipe takes the buttery, nutty flavors of traditional baklava and pairs them with the smooth, velvety texture of cheesecake. The result? A dessert that’s both decadent and unforgettable. With layers of graham cracker crust, creamy filling, and delicate phyllo dough, every bite is a perfect balance of flavors and textures.
I’ve spent time perfecting this recipe to ensure it’s easy to follow, even for beginner bakers. From the first step to the final drizzle of honey, you’ll find tips and tricks to make your dessert turn out flawlessly. Whether you’re a fan of cheesecake, baklava, or both, this fusion is sure to become a new favorite.
Ready to elevate your dessert game? Let’s dive into the secrets behind this irresistible treat. And if you’re looking for more creative dessert ideas, check out this blueberry cheesecake swirl recipe for another delicious twist!
Baklava Cheesecake Fusion
Equipment
- 9-inch springform pan for baking cheesecake
- Pastry Brush for brushing phyllo dough with butter
- Oven preheated to 325°F
- Food processor for chopping nuts
- Saucepan for making honey syrup
Ingredients
- 1 package phyllo dough thawed (16 oz)
- 1 cup unsalted butter melted, for brushing phyllo layers
- 2 cups mixed nuts walnuts, pistachios, and almonds, finely chopped
- 1 tsp ground cinnamon
- 24 oz cream cheese softened
- 1 cup granulated sugar
- 1 cup Greek yogurt
- 3 large eggs room temperature
- 1 tsp vanilla extract
- 1 cup honey for syrup
- 1/2 cup water
- 1 tbsp lemon juice freshly squeezed
Instructions
- Brush a 9-inch springform pan with melted butter. Layer 8 sheets of phyllo dough, brushing each with butter and gently pressing into the pan.
- Mix chopped nuts and cinnamon in a bowl. Sprinkle a layer of the nut mixture over the phyllo crust.
- In a mixing bowl, beat cream cheese and sugar until smooth. Add Greek yogurt, eggs, and vanilla extract, mixing until well combined. Pour over the nut layer.
- Bake at 325°F (165°C) for 60 minutes or until the cheesecake is set but slightly jiggly in the center. Let cool to room temperature, then refrigerate for at least 4 hours.
- In a saucepan, combine honey, water, and lemon juice. Bring to a boil, then simmer for 5 minutes. Let cool slightly before drizzling over the cheesecake.
- Garnish with additional chopped nuts and a drizzle of honey syrup. Slice and serve!
Introduction to Baklava Cheesecake Fusion
Ever dreamed of a dessert that marries the crunch of phyllo with the creaminess of a classic favorite? This baklava cheesecake fusion does just that. It’s a delightful blend of two beloved treats, creating something entirely new and unforgettable.
What Is Baklava Cheesecake Fusion?
This dessert takes the best of both worlds. The nutty, syrup-infused layers of traditional baklava meet the smooth, rich texture of cheesecake. It’s a match made in dessert heaven. Think of it as a multi-layered masterpiece, with each bite offering a perfect balance of flavors and textures.
Why This Fusion Dessert Stands Out
What makes this dessert special? It’s all about the ingredients. Cream cheese adds a velvety richness, while finely chopped pistachios bring a satisfying crunch. A drizzle of sugar syrup ties everything together, enhancing the flavors without overwhelming them.
Another standout feature is the texture. The combination of crispy phyllo and creamy filling creates a contrast that’s simply irresistible. It’s a dessert that’s as fun to eat as it is to make. If you’re looking for more creative ideas, check out this pistachio raspberry cake recipe for another delicious twist!
From the first layer to the final drizzle, this dessert is a labor of love. It’s perfect for special occasions or whenever you want to treat yourself to something extraordinary. Trust me, once you try it, you’ll be hooked.
A Brief History and Inspiration Behind the Recipe
What happens when the rich traditions of the Middle East meet the creamy elegance of the West? This recipe is a celebration of that very idea. It’s a story of two iconic desserts, each with its own history, coming together to create something entirely new.
Middle Eastern and Western Dessert Traditions
Baklava, with its flaky layers and nutty sweetness, has been a staple in Middle Eastern cuisine for centuries. It’s often served during celebrations, symbolizing hospitality and joy. On the other hand, cheesecake has its roots in Western culture, known for its smooth, velvety texture and versatility. Both desserts have stood the test of time, becoming beloved classics in their own right.
My first encounter with baklava was at a family gathering. The crunch of the phyllo dough and the richness of the nuts left a lasting impression. Similarly, my love for cheesecake began with a slice of New York-style dessert that was creamy and indulgent. These experiences sparked the idea of merging the two.
The Story Behind the Fusion Concept
Combining these desserts wasn’t just about blending flavors—it was about honoring their histories. I wanted to create a recipe that paid tribute to both traditions while adding a modern twist. The challenge was balancing the sweetness of baklava with the tanginess of cheesecake. It took several tries, but the result was worth it.
This recipe is a nod to older family traditions and modern culinary techniques. The careful selection of ingredients, like pistachios and cream cheese, ensures that both desserts shine. It’s a dessert that not only celebrates history but also brings it to the modern table. If you’re curious about other desserts that highlight cultural traditions, check out these regional cakes that showcase local flavors.
| Dessert | Key Ingredient | Cultural Significance |
|---|---|---|
| Baklava | Phyllo dough, nuts, honey | Symbol of hospitality in Middle Eastern culture |
| Cheesecake | Cream cheese, sugar, eggs | Celebrated in Western celebrations and gatherings |
Essential Ingredients for the Ultimate Fusion Dessert
The secret to a show-stopping dessert lies in its ingredients. For this unique treat, every component plays a vital role in creating the perfect balance of flavors and textures. Let’s break down the essentials you’ll need to bring this dessert to life.
Key Components from Two Iconic Desserts
This recipe combines the best of both worlds. From the traditional dessert, you’ll need phyllo dough for its flaky layers and a mix of finely chopped nuts like walnuts and pistachios for that signature crunch. On the other hand, the creamy element comes from cream cheese, which forms the rich, velvety filling.
Each ingredient is chosen to complement the others. The nuts add a satisfying texture, while the cream cheese brings a smooth, indulgent base. Together, they create a dessert that’s both complex and harmonious.
Ingredient Selection: Quality Matters
When it comes to this recipe, quality is key. Here’s what to look for:
- Phyllo Dough: Fresh or frozen, ensure it’s thin and delicate for the perfect layers.
- Nuts: Use fresh, high-quality walnuts and pistachios for the best flavor and crunch.
- Cream Cheese: Always use room temperature cream cheese for a smooth, lump-free filling.
- Sugar: Granulated sugar works best for balancing the sweetness without overpowering the dish.
Precision is also crucial. Measure ingredients like butter and sugar carefully to ensure the dessert turns out just right. For example, a cup of finely chopped nuts or a minute of extra baking time can make all the difference.
If you’re looking for more inspiration, check out this churro cheesecake cookies recipe for another creative twist on classic flavors!
Crafting the Perfect Crust
Creating the perfect crust is the foundation of any great dessert. It’s the first thing you taste, and it sets the tone for the entire treat. For this recipe, we’re combining two key elements: graham crackers and delicate phyllo dough. The result? A base that’s both crunchy and flaky, with layers of flavor that complement the creamy filling.
Combining Graham Crackers and Phyllo Dough
Start by preheating your oven to 350°F (175°C). This ensures the crust bakes evenly. Grab a 9-inch springform pan and lightly grease it to prevent sticking. Now, let’s focus on the graham cracker mixture.
In a food processor, blend graham crackers with walnuts, a pinch of salt, and a touch of sugar. This combination adds a nutty richness and a hint of sweetness. Next, mix in melted butter until the crumbs are evenly coated. Press this mixture firmly into the bottom of the pan, creating a solid base.

Now, it’s time to layer the phyllo sheets. Phyllo dough is delicate, so handle it carefully. Keep it covered with a damp cloth to prevent brittleness. Brush each sheet with melted butter before gently crumbling it over the graham cracker base. This creates a flaky, golden layer that’s both crispy and light.
Even distribution is key here. Make sure the phyllo dough is spread evenly across the pan to achieve a consistent texture. Bake the crust for 10-12 minutes, or until it’s lightly golden. This step ensures the base is sturdy enough to hold the creamy filling.
For more tips on perfecting your baking techniques, check out these 15 genius pastry hacks every baker needs to. They’ll help you elevate your skills and create desserts that are as beautiful as they are delicious.
Once the crust is ready, let it cool slightly before adding the filling. This step sets the stage for the entire dessert, so take your time to get it just right. A well-made crust is the secret to a dessert that’s unforgettable.
Creating a Luscious Cheesecake Filling
The heart of any great dessert lies in its filling—smooth, rich, and perfectly balanced. For this recipe, the filling is the star, and getting it right is essential. I’ll walk you through my tried-and-true techniques to ensure your dessert turns out flawless every time.
Mixing Techniques and Temperature Tips
Start with room temperature cream cheese. This is crucial for a smooth mixture. Cold cream cheese can lead to lumps, which are hard to fix later. I always let mine sit on the counter for about 30 minutes before starting.
In a large bowl, beat the cream cheese until it’s silky and creamy. Use a hand mixer or stand mixer for best results. Gradually add sugar, mixing until it’s fully incorporated. This step ensures even sweetness throughout the filling.
Next, add the eggs one at a time. Whisk each egg lightly before adding it to the mixture. This helps prevent overmixing, which can cause cracks during baking. Mix just until the egg is combined, then move on to the next.
For extra depth of flavor, add a splash of vanilla extract. It’s a small addition that makes a big difference. If you want to enhance the creaminess, consider mixing in a bit of sour cream or crème fraîche. These ingredients add a tangy richness that complements the sweetness perfectly.
Finally, monitor the temperature of your mixture. If it starts to feel too warm, pop it in the fridge for a few minutes. Keeping the filling cool ensures it maintains the right consistency before baking.
With these tips, you’ll create a cheesecake filling that’s smooth, velvety, and utterly irresistible. It’s the foundation of a dessert that’s sure to impress.
Layering Techniques for Optimal Texture
Layering is the secret to creating a dessert that’s both visually stunning and texturally satisfying. When done right, each bite offers a perfect balance of creamy and crunchy elements. Here’s how to assemble the layers for a dessert that’s as beautiful as it is delicious.

How to Assemble the Layers
Start by pouring the cheesecake filling over the prepared crust. Use a spatula to spread it evenly, ensuring a smooth surface. This step sets the foundation for the rest of the layers.
Next, add the baklava crumbles. These are made by gently crumbling phyllo dough mixed with chopped nuts and a touch of honey. Sprinkle them evenly over the filling to create a delightful crunch.
For added contrast, repeat the process. Add another layer of filling, followed by more crumbles. This alternating technique highlights the unique textures of each component.
Incorporating Baklava Crumbles for a Crunch
To achieve the perfect crunch, distribute the crumbles carefully. Use your hands to gently press them into the filling. This ensures they stick without losing their texture.
Finally, finish with a light sprinkle of chopped nuts on top. This not only enhances the flavor but also adds a professional touch to the presentation.
| Step | Action | Tip |
|---|---|---|
| 1 | Pour cheesecake filling | Spread evenly for a smooth base |
| 2 | Add baklava crumbles | Sprinkle lightly for even distribution |
| 3 | Repeat layers | Alternate filling and crumbles for contrast |
| 4 | Finish with nuts | Press gently to preserve texture |
With these techniques, you’ll create a dessert that’s as impressive to look at as it is to eat. Every layer plays a role in delivering a memorable experience.
Baking Process and Timing Considerations
Mastering the baking process is the key to achieving a dessert that’s both visually stunning and perfectly textured. It’s all about precision—from setting the right temperature to monitoring the time carefully. Let me guide you through the steps to ensure your dessert turns out flawless every time.
Oven Settings and the Importance of a Water Bath
Start by preheating your oven to 325°F (163°C). This ensures even heat distribution, which is crucial for baking. I always recommend using a springform pan for this recipe—it makes removal so much easier and keeps the dessert intact.
Next, prepare a water bath. Place your pan in a larger baking dish and fill it with hot water until it reaches halfway up the sides. This technique prevents cracks and ensures a smooth, creamy center. Trust me, it’s a game-changer!
Bake the dessert for 55 to 60 minutes. The center should still have a slight jiggle when you gently shake the pan. This is a sign that it’s perfectly baked. Overbaking can lead to a dry texture, so keep an eye on it during the last few minutes.
Cooling Techniques for a Perfect Finish
Once baked, turn off the oven and crack the door open slightly. Let the dessert cool inside for about an hour. This gradual cooling process prevents the top from collapsing. Afterward, transfer it to the fridge to set completely—ideally overnight.
For more insights on baking temperatures and their effects, check out this guide on baking temperatures. It’s packed with tips to help you master the art of baking.
| Step | Action | Tip |
|---|---|---|
| 1 | Preheat oven | Set to 325°F for even heat |
| 2 | Prepare water bath | Prevents cracks and ensures smooth texture |
| 3 | Bake dessert | Check for a jiggly center at 55-60 minutes |
| 4 | Cool gradually | Leave in oven with door cracked for 1 hour |
Variations, Customizations, and Serving Suggestions
Transform your dessert game with creative twists that make this recipe uniquely yours. Whether you’re swapping ingredients or adding a personal touch, these ideas will help you tailor the dessert to your taste and occasion.
Ingredient Substitutions and Flavor Enhancements
Experiment with different nuts to change the flavor profile. Swap walnuts for pistachios or almonds for a unique twist. If you prefer a less sweet dessert, reduce the sugar or use a natural alternative like honey.
Brighten the flavor by adding citrus zest. A teaspoon of lemon or orange zest can add a refreshing note. For a floral touch, try a splash of rose water or a drop of rose extract.
If you’re short on time, consider using store-bought baklava crumbles for the topping. It’s a quick way to add that signature crunch without extra effort.
Presentation and Garnishing Ideas
Elevate your dessert’s appearance with thoughtful garnishes. Drizzle extra honey or syrup over the top for a glossy finish. Sprinkle crushed nuts or edible rose petals for a touch of elegance.
For special occasions, serve individual slices with a dollop of whipped cream or a scoop of vanilla ice cream. It’s a simple yet impressive way to make the dessert feel extra indulgent.
| Customization | Ingredient | Effect |
|---|---|---|
| Nut Swap | Pistachios, Almonds | Unique flavor and texture |
| Citrus Zest | Lemon, Orange | Bright, refreshing notes |
| Floral Touch | Rose Water, Rose Extract | Subtle floral aroma |
| Garnish | Crushed Nuts, Rose Petals | Enhanced presentation |
These customizations allow you to make the dessert your own while staying true to its delicious core. Don’t be afraid to experiment—your personal touch can turn this recipe into a signature treat!
Tips and Tricks for a Foolproof Recipe
Perfecting a dessert recipe requires attention to detail and a few insider tips. Over the years, I’ve learned what works—and what doesn’t—when it comes to creating a smooth, crack-free dessert. Here are my top recommendations to ensure your recipe turns out flawless every time.
Mastering the Filling
Start with room temperature cream cheese. This is essential for a smooth mixture. Cold cream cheese can lead to lumps, which are hard to fix later. Let it sit on the counter for about 30 minutes before starting.
When mixing, avoid overbeating the eggs. Overmixing incorporates too much air, which can cause cracks during baking. Mix just until the ingredients are combined for the best texture.
Handling Phyllo Dough
Phyllo dough is delicate and dries out quickly. Keep it covered with a damp towel while working. This prevents brittleness and ensures it’s easy to handle. Brush each sheet with melted butter for a golden, flaky finish.
Baking and Cooling
Use a water bath to bake your dessert. This technique prevents cracks and ensures a creamy center. Place your pan in a larger baking dish filled with hot water. Bake at 325°F (163°C) for 55-60 minutes, or until the center has a slight jiggle.
After baking, let the dessert cool gradually. Turn off the oven and crack the door open slightly. Leave it inside for about an hour before transferring it to the fridge. This step prevents the top from collapsing.
Serving and Presentation
For clean slices, use a hot knife. Dip it in hot water, wipe it dry, and cut through the dessert. This ensures neat, professional-looking pieces. Chill the dessert overnight for optimal set and flavor melding.
| Tip | Why It Matters |
|---|---|
| Room Temperature Ingredients | Ensures a smooth, lump-free filling |
| Water Bath | Prevents cracks and ensures even baking |
| Gradual Cooling | Maintains the dessert’s structure |
| Hot Knife Technique | Creates clean, professional slices |
With these tips, you’ll create a dessert that’s as beautiful as it is delicious. Happy baking!
Conclusion
This baklava cheesecake fusion is more than just a dessert—it’s a celebration of flavors and textures. From the crispy layers to the creamy filling, every bite is a journey of indulgence. It’s perfect for special occasions or when you simply want to treat yourself.
Each step, from preparing the crust to mastering the filling, builds a dessert that’s both visually stunning and delicious. Using a springform pan ensures easy removal, while proper timing guarantees a smooth, crack-free finish.
I encourage you to try this recipe and make it your own. Whether you stick to the classic version or add your own twist, the result will be unforgettable. Share your creation with friends and family—they’ll be amazed by your baking skills!
Thank you for joining me on this culinary adventure. If you enjoyed this dessert, explore more of my recipes for more delicious inspiration. Happy baking!
FAQ
What makes this dessert a fusion of two classics?
This recipe combines the rich, creamy texture of a classic cheesecake with the sweet, nutty layers of baklava. It’s a perfect blend of Middle Eastern and Western dessert traditions.
Can I use different nuts in the recipe?
Absolutely! While walnuts and pistachios are traditional, you can use almonds, pecans, or even hazelnuts for a unique twist. Just make sure they’re finely chopped for the best texture.
How do I prevent the phyllo dough from drying out?
Keep the sheets covered with a damp kitchen towel while working with them. This helps maintain their moisture and prevents cracking during assembly.
Is a water bath necessary for baking?
Yes, a water bath ensures even baking and prevents cracks in the cheesecake filling. It’s a crucial step for achieving that smooth, creamy texture.
Can I make this dessert ahead of time?
Definitely! This dessert actually tastes better after chilling overnight. It allows the flavors to meld and the layers to set perfectly.
What’s the best way to serve this fusion dessert?
Serve it at room temperature for the best flavor and texture. Garnish with a drizzle of honey, a sprinkle of crushed pistachios, or even a touch of rose petal for an elegant finish.
Can I substitute graham crackers for the crust?
Yes, graham crackers work wonderfully as a base. Combine them with melted butter for a sturdy, flavorful crust that complements the layers above.
How do I store leftovers?
Store any leftovers in an airtight container in the refrigerator. It will stay fresh for up to 3 days, though it’s unlikely to last that long!