
Making your homemade pies look like they came from a bakery is an art. It begins with the perfect pie crust edges. We’ll dive into decorative pie crust techniques, from simple crimping to detailed designs. Your pies will be not just tasty but also a feast for the eyes!
Key Takeaways
- Discover a variety of techniques for creating beautiful and unique pie crust edges
- Learn how to master the art of crimping, fluting, and lattice work for a professional finish
- Explore seasonal and decorative cutout options to add a personal touch to your pies
- Troubleshoot common pie crust edge problems and learn expert tips for perfect results
- Elevate your homemade pies with creative and visually stunning crust designs
We’ll explore everything from classic crimping to intricate lattice work. These techniques will turn your pies into true culinary masterpieces. Join me on this journey to elevate your pie crust game and wow your loved ones with your new baking skills.
Essential Tools and Ingredients for Perfect Pie Crusts
Creating beautiful pie crust edges starts with the right tools and ingredients. As a seasoned baker, I’ve found that the secret to perfect pie crusts is in the details. The right pastry blender and rolling pin are key to shaping your pie’s look and feel.
Must-Have Baking Tools for Pie Making
- Pastry blender: This handy tool helps cut cold butter or shortening into the flour, creating the perfect flaky texture.
- Marble rolling pin: The coolness of the marble helps keep the dough from sticking and overheating during rolling.
- Pastry cloth and rolling pin sleeve: These specialized surfaces prevent the dough from adhering to the work surface and rolling pin.
- Pie plates or tins: Ensure you have a variety of sizes and materials to accommodate different pie recipes and designs.
Quality Ingredients That Make a Difference
When it comes to pie crust edges and techniques, the ingredients you choose are key. Use high-quality flour, butter, and shortening for the perfect flaky texture and crimping pie crust edges.
Temperature Control Equipment
Maintaining the right temperature is crucial for your pie crust. Invest in a kitchen thermometer and oven temperature probe to monitor and adjust the heat as needed.
With the right tools and ingredients, you’ll create beautiful, professional-looking pie crusts. Your family and friends will be impressed by your pie crust edges.
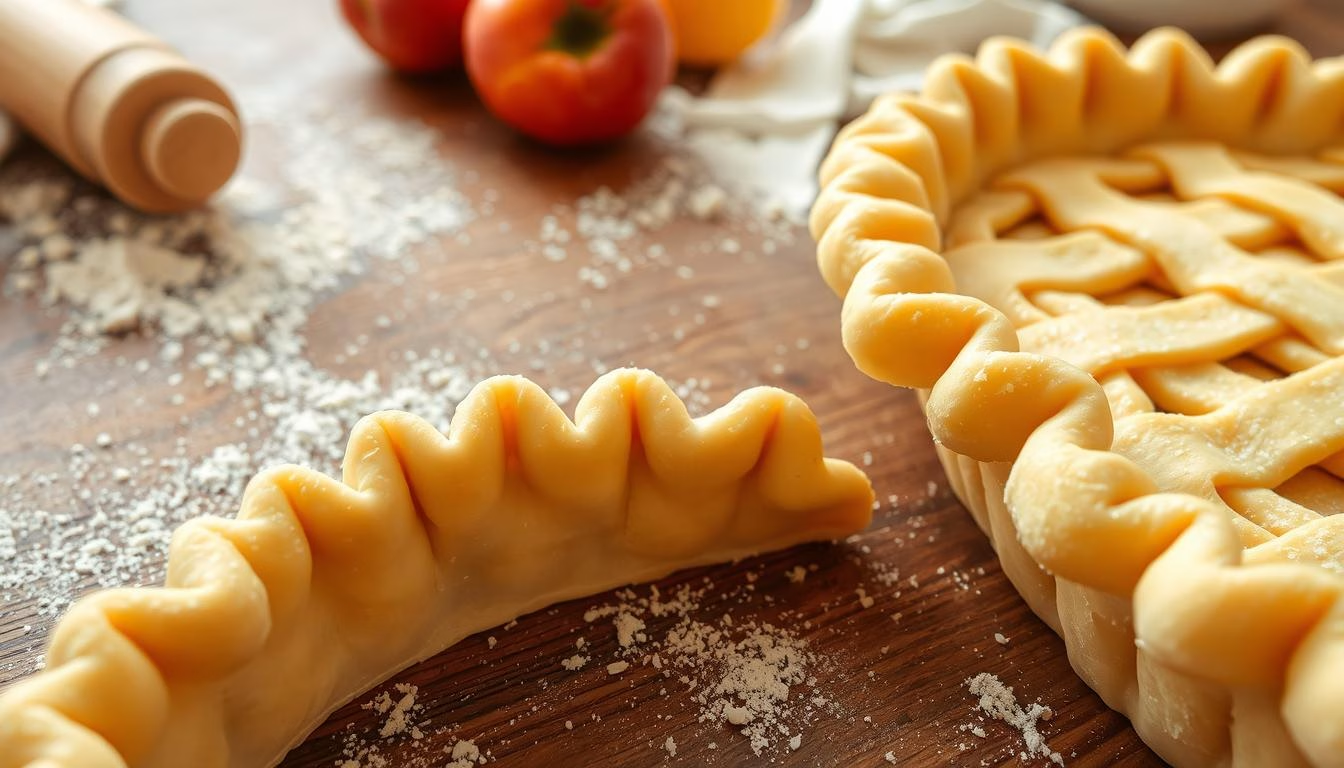
Mastering Basic Pie Crust Edges and Techniques
The crust edges of a pie are often overlooked but are key to a great look. From fluting pie crust to decorative pie crust edges, learning these basics is crucial. It helps make pies that wow your guests.
Let’s begin with the basics. Crimping is a classic and timeless method. It involves pinching and folding the dough with your fingers to create a beautiful edge. Make sure your dough is chilled well before you start.
- For a classic pinch crimping technique, use your thumb and index finger to create small, uniform folds around the pie crust edge.
- Try the fork pressed edges for a decorative, ridged pattern. Just press the fork tines into the dough.
For a more advanced look, try fluting. This method uses your index finger and thumb to make delicate waves. Work slowly and gently to get a consistent pattern.
| Technique | Description | Visual Appeal |
|---|---|---|
| Pinch Crimping | Using your thumb and index finger to create small, uniform folds | Classic, elegant |
| Fork Pressed Edges | Pressing the tines of a fork into the dough for a decorative pattern | Rustic, charming |
| Fluting | Creating delicate waves with your index finger and thumb | Visually striking, professional-looking |
Learning these basic pie crust edge techniques is the first step to more advanced designs. Stay tuned for our next section on traditional crimping methods and how to make elegant edges.

“The secret to a truly memorable pie is all in the crust. Mastering those basic edge techniques is the first step to creating a masterpiece that will have everyone coming back for seconds.”
Traditional Crimping Methods for Elegant Edges
Adding a touch of elegance to your homemade pies is easy and impressive. We’ll dive into traditional crimping techniques. These can turn a simple pie crust into a stunning centerpiece.
Classic Pinch Crimping
The classic pinch crimp is a timeless and simple method. To do it, pinch the dough with your thumb and index finger. This creates a beautiful pattern around the pie. It also seals the crust, preventing leaks.
Fork Pressed Edges
The fork-pressed edge offers a textured look. Press the fork’s tines into the dough around the pie. This makes a delicate, scalloped pattern that catches the light. Chill the dough well before pressing to keep the design sharp.
Fluted Edge Designs
For a more advanced look, try the fluted edge. Pinch and fold the dough to create ridges. Experiment with different patterns to get unique designs. With practice, you’ll master this technique and elevate your pies.
Discover creative crimping techniques to make your pie crusts stunning. Whether you like simple pinch crimps or intricate fluted edges, these methods add elegance to your baked goods.
| Crimping Technique | Description | Skill Level |
|---|---|---|
| Classic Pinch Crimp | Pinching the dough between thumb and index finger to create a decorative pattern | Easy |
| Fork Pressed Edges | Pressing the tines of a fork into the dough to create a scalloped pattern | Moderate |
| Fluted Edge Designs | Gently pinching and folding the dough to create a series of decorative ridges | Advanced |
Learning these traditional crimping pie crust and fluting pie crust techniques will make your homemade pies stand out. They’ll be the stars of the dessert table.
Advanced Decorative Edge Patterns
Ready to wow your guests with pie crust edges? We’re about to dive into advanced patterns that turn pies into edible masterpieces. From braids to scallops, these techniques will make your desserts stand out.
Braided Pie Crust Edges
Want to elevate your pie game? Try a braided edge. This method twists dough strips into a stunning plait. Work slowly to keep each twist tight and even. The result is a beautiful finish that adds elegance to any pie.
Scalloped Crust Edges
For a whimsical touch, try scalloped edges. Use a fork or fingers to press waves around the dough. This look is perfect for spring and summer pies, adding a delightful texture.
Intricate Cutout Designs
Take your pie crust edges to the next level with cutout designs. Use a sharp knife or cookie cutters for intricate shapes. From leaves to flowers, the possibilities are endless for showcasing your creativity.

“The secret to stunning pie crust edges is to have fun and let your creativity shine. Don’t be afraid to experiment with different techniques and patterns – the results can be truly magical.”
With these advanced techniques, you can turn any pie into a masterpiece. So, put on your apron, gather your ingredients, and impress your friends and family with your baking skills.
Creating Stunning Lattice Work Designs
Adding elegance to homemade pies is easy with the latticework pie crust technique. It’s simple yet impressive. With a few steps and some creativity, you can turn a basic pie crust into a masterpiece.
Basic Lattice Patterns
The classic lattice pattern is a great starting point. It’s made by weaving dough strips over and under each other. This creates a criss-cross design that’s both simple and stunning.
To get it right, cut your dough strips evenly. Lay them out with precision. This will help you achieve a perfect lattice.
Complex Weaving Techniques
Once you’ve got the basic lattice down, try more complex patterns. Think diamond or braided lattices. These require more skill but are worth it for the stunning results.
With practice, your lattice work will look like it’s from a fancy bakery. It’s a great way to show off your baking skills.
Twisted Rope Lattice Variations
For an even more striking design, add a twisted rope element. Braiding or twisting the dough strips before weaving them creates a unique pattern. It’s a bit more work but the result is amazing.
Whether you choose a classic lattice, a complex weave, or a twisted rope design, latticework is a game-changer. With practice and creativity, your latticework pie crusts will impress everyone.
Seasonal Pie Crust Decorations and Cutouts
As seasons change, why not make your pie crust show the beauty of nature? From spring blossoms to autumn leaves, there’s a lot to explore. With simple techniques and creativity, you can make your pies into edible art that celebrates each season.
Spring Florals
Welcome spring with a pie crust full of leaf pie crust design. Use cookie cutters for tulips, daffodils, or cherry blossoms to make a floral border. For fun, cut out small flowers and scatter them on the crust.
Summer Sunbursts
Summer brings energy, and so does your pie crust with pie crust cutouts of sun shapes. Try radiating lines, geometric patterns, and playful shapes for a cheerful look. Play with sizes and placement for a dynamic design.
Autumnal Leaves
Bring autumn’s colors to your pie crust with leaf pie crust design. Use a leaf-shaped cutter for a border or freehand cut-outs of maple, oak, or aspen leaves. Scatter or layer the leaves for a stunning look.
Festive Snowflakes
Winter brings cold, but your pie crust can be warm with pie crust cutouts of snowflakes. Cut out intricate designs with a knife or small cutter. Place them randomly or together for a big impact.
Decorating your pie crust adds flair, making it a showstopper. With creativity and the right tools, your baking will bring joy and celebration to every slice.
Troubleshooting Common Pie Crust Edge Problems
Getting perfect pie crust edges can be tough, even for experts. But don’t worry, I’m here to help! We’ll look at ways to fix common issues like preventing shrinkage, uneven browning, and cracked edges.
Preventing Shrinkage and Slumping
Shrinkage and slumping in pie crusts can be a big problem. To avoid this, remember to:
- Use a well-chilled, firm dough that’s been properly rested before rolling and shaping.
- Avoid overworking the dough, as this can develop too much gluten and cause shrinkage.
- Blind bake the crust before adding the filling to help it keep its shape.
- Trim any excess dough from the edges to reduce the risk of shrinkage.
Fixing Uneven Browning
Getting a crust that’s evenly golden-brown can be hard. To get consistent browning:
- Make sure your oven is properly calibrated and at the correct temperature.
- Use a light-colored baking sheet that won’t absorb too much heat.
- Brush the crust with an egg wash or milk to promote even browning.
- Consider covering the edges with foil or a pie crust shield to prevent over-browning.
Solutions for Cracking Edges
Cracked or brittle pie crust edges can be a disappointment. To prevent this:
- Handle the dough gently and avoid overworking it.
- Make sure to properly crimp and seal the edges to reinforce the structure.
- Brush the edges with an egg wash or milk to help them stay flexible and prevent cracking.
- Consider using a decorative edge design, like fluting or a twisted rope, to add strength and visual interest.
By tackling these common pie crust edge problems, you’ll be on your way to making pies that wow everyone. Happy baking!
Professional Tips for Perfect Edge Finishing
Want to take your pie crust edges from good to great? It’s all about mastering the right finishing techniques. As an experienced baker, I’m excited to share some insider secrets. These tips will make your pies look like they came from a gourmet bakery.
First, achieving a glossy, golden-brown edge is key. The secret? Brush your crust with a thin layer of beaten egg or milk before baking. This simple step creates a beautiful sheen and helps the edges develop that mouthwatering color.
Next, consider adding a subtle textural element to your crust edges. One of my favorite techniques is fluting the pie crust – simply use your fingers to create delicate ridges and waves along the border. Not only does this add visual interest, but the fluted design also helps prevent the crust from slumping during baking.
- Brush crust with egg or milk wash for a glossy, golden-brown finish
- Flute the pie crust edges to add subtle texture and visual appeal
- Experiment with decorative decorative pie crust edges like lattice work or cutouts
- Chill crust thoroughly before baking for maximum flakiness
And don’t be afraid to get creative with decorative elements! Lattice work, cutouts, and other special touches can elevate your pies to new heights. The key is to have fun and let your personal style shine through.
| Technique | Effect | Difficulty Level |
|---|---|---|
| Egg/Milk Wash | Glossy, golden-brown edges | Easy |
| Fluted Edges | Subtle texture and visual interest | Moderate |
| Decorative Edges | Wow-factor presentation | Advanced |
With these professional tips in your arsenal, you’ll be well on your way to baking pies that not only taste amazing, but look absolutely stunning. So grab your rolling pin and let’s get to work – your guests are in for a real treat!

Conclusion
We’ve looked into pie crust edges and techniques. I hope you’ve learned a lot and are excited to improve your baking. You now know how to make pies look amazing, from basic tools to fancy designs.
Creating beautiful pie crust edges takes practice and a love for learning. Try new things and see what works for you. Every time you bake, you’ll get better at making pies that look and taste great.
With what you’ve learned, your pies will be stunning. They’ll impress everyone who tries them. So, get ready to bake and make your pies even better!
FAQ
What are the essential tools and ingredients for creating perfect pie crusts?
To make beautiful pie crust edges, you need the right tools and ingredients. You’ll need a pastry wheel, marble rolling pin, and fluted pie dish. Also, use quality ingredients like all-purpose flour, cold butter, and ice water for the best texture and flavor.
How do I master basic pie crust edge techniques?
Start with the basics like simple crimping, fluting, and clean edges. These skills are the foundation for more complex designs.
What are some traditional crimping methods for elegant pie crust edges?
Classic crimping methods like pinch crimp, fork-pressed edges, and fluted designs add elegance. These are easy to learn and will make your pies look professional.
How can I create advanced decorative edge patterns?
For more advanced designs, try braided edges, scalloped designs, and intricate patterns. These techniques will turn your pies into edible art.
What are some tips for achieving stunning lattice work designs?
Lattice work is a timeless technique. I’ll show you basic and complex lattice patterns, including twisted rope designs. Your pies will look like they’re from a fancy bakery.
How can I add seasonal flair to my pie crust decorations?
Add seasonal touches with decorative cutouts and designs. Use cookie cutters and freehand techniques for spring flowers or autumn leaves. This will celebrate the flavors of the season.
How do I troubleshoot common pie crust edge problems?
Even experienced bakers face pie crust edge challenges. I’ll cover issues like shrinkage, slumping, and cracking. I’ll also share solutions and preventive measures for perfect edges every time.
What are some professional tips for perfect pie crust edge finishing?
Improve your pie crust edges with these professional tips. Learn how to achieve glossy, golden-brown edges and add texture. These secrets will make your pies look gourmet.