

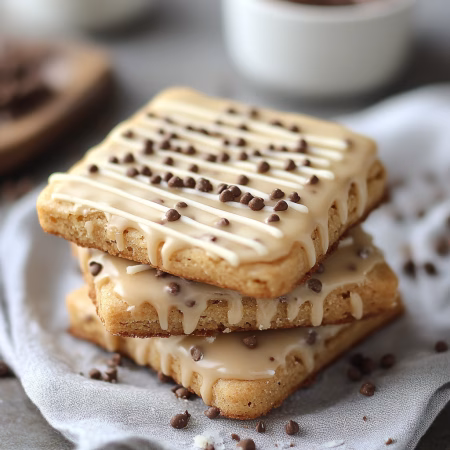
I still remember the first time I bit into a warm, gooey pop tart straight from the toaster—the crispy edges, the sweet cinnamon filling, the comforting nostalgia of a simple treat. Now, imagine that same cozy flavor wrapped in the soft, chewy perfection of a homemade cookie. That’s exactly what this Brown Sugar Pop Tart Cookies Recipe delivers—a dessert that merges two childhood favorites into one irresistible bite.
This recipe is all about balance: a buttery, golden-brown cookie shell encasing a rich, spiced brown sugar filling, finished with that signature pop tart glaze. The result? A soft, melt-in-your-mouth treat with just the right touch of crispness on the edges. It’s like a toaster pastry, but better—because it’s made from scratch, with love, and without the processed taste of store-bought versions.
I’ve spent time perfecting every detail, from the ratio of cinnamon to sugar to the way the dough bakes up perfectly tender. Whether you’re baking for a cozy night in or looking to impress with something unique, these cookies are guaranteed to steal the show. Let’s get started and bring this nostalgic favorite to life in a whole new way!
Brown Sugar Pop Tart Cookies
Equipment
- Electric mixer for creaming butter and sugar
- Baking sheet lined with parchment paper
- Oven
- Spatula for mixing ingredients
- Cookie scoop for evenly portioning dough
Ingredients
- 1 cup unsalted butter softened
- 1 cup brown sugar packed
- 0.5 cup granulated sugar
- 2 large eggs room temperature
- 2 tsp vanilla extract
- 2.5 cups all-purpose flour sifted
- 1 tsp baking soda
- 1 tsp ground cinnamon
- 0.5 tsp salt
- 3 Pop-Tarts brown sugar cinnamon chopped into small pieces
Instructions
- Preheat oven to 350°F (175°C) and line a baking sheet with parchment paper.
- In a mixing bowl, beat the softened butter, brown sugar, and granulated sugar with an electric mixer until light and fluffy.
- Beat in the eggs and vanilla extract until fully incorporated.
- In a separate bowl, whisk together the flour, baking soda, cinnamon, and salt.
- Gradually mix the dry ingredients into the wet ingredients until just combined.
- Gently fold in the chopped Pop-Tarts until evenly distributed.
- Use a cookie scoop to portion the dough onto the prepared baking sheet, spacing them 2 inches apart. Bake for 10-12 minutes, or until the edges are golden brown.
- Let cookies cool on the baking sheet for 5 minutes before transferring to a wire rack to cool completely.
Notes
- Optional Equipment: A hand whisk can be used instead of an electric mixer for smaller batches.
- Customization: Drizzle with a simple glaze made from powdered sugar and milk for extra sweetness.
- Storage: Store in an airtight container at room temperature for up to 5 days.
- Serving Tip: Warm slightly before serving for a softer texture.
Nutrition
Introduction to This Giant Pop Tart Experience
Ever wondered what happens when you take a classic treat and make it larger than life? That’s exactly what I set out to do with this recipe. It’s not just a dessert—it’s an experience. Imagine the familiar flavors you love, but with a twist that’s as bold as it is delicious.
The Inspiration Behind the Recipe
My love for traditional treats inspired this creation. I wanted to capture the nostalgia of a classic pop tart but amplify it in every way. The idea of a giant pop tart came to me during a baking session, and I knew I had to bring it to life.
What makes this recipe special is the balance of flavors. The warmth of sugar cinnamon fills every bite, creating a taste that’s both comforting and exciting. It’s a nod to the past with a modern twist.
What Makes This Treat Special
This isn’t just any recipe—it’s a labor of love. Every step, from selecting the finest ingredients to perfecting the baking process, has been carefully thought out. The result is a treat that’s as delightful to make as it is to eat.
The aroma of sugar cinnamon pop filling the kitchen is unforgettable. It’s a sensory experience that invites you to savor every moment. Whether you’re baking for yourself or sharing with loved ones, this recipe is sure to impress.
| Aspect | Details |
|---|---|
| Flavor Profile | Warm sugar cinnamon with a hint of nostalgia |
| Texture | Flaky crust with a gooey, flavorful filling |
| Baking Time | 25–30 minutes at 350°F |
| Serving Size | Perfect for sharing or indulging solo |
This recipe is more than just a dessert—it’s a celebration of creativity and joy. I invite you to join me on this culinary adventure and create something truly special in your kitchen.
Essential Ingredients for Brown Sugar Pop Tart Cookies
The foundation of any great recipe lies in its ingredients—let’s dive into what makes these treats so special. From the flaky crust to the gooey filling, every component plays a crucial role in creating the perfect balance of flavor and texture.

Crust Components and Their Roles
The crust is the backbone of this recipe, and it starts with King Arthur Unbleached All-Purpose Flour. This high-quality flour ensures a tender, flaky texture. To measure it accurately, spoon the flour into your measuring cup and level it off—this prevents packing too much into the dough.
Next, granulated sugar adds a touch of sweetness, while cold unsalted butter creates that perfect crumbly texture. Combine these with a stand mixer fitted with a flat beater for even mixing. Eggs and milk bring moisture and richness, while a splash of vanilla extract enhances the flavor profile.
Filling and Icing Essentials
The filling is where the magic happens. A blend of light brown sugar and ground cinnamon creates a warm, comforting flavor. A small amount of all-purpose flour thickens the filling, ensuring it stays gooey without spilling out during baking.
For the icing, powdered sugar forms the base, while dark brown sugar adds depth. A touch of vanilla extract and ground cinnamon ties everything together. A splash of milk helps achieve the perfect consistency for drizzling over the finished cookies.
Using high-quality ingredients and precise measurements ensures that every bite is a delight. Whether you’re a seasoned baker or just starting out, these components will help you create a treat that’s as fun to make as it is to eat.
Preparing the Dough: Mixing and Rolling Techniques
Creating the perfect dough is an art—here’s how to master it. The key lies in the details, from mixing at the right speed to rolling with precision. Let’s explore the techniques that ensure a flaky, tender result every time.
Mix Low Speed for a Perfect Crumb
Start by combining your ingredients in a stand mixer at low speed. This helps create a crumbly yet cohesive dough. Overmixing can lead to toughness, so keep it gentle. I recommend using the mix low speed setting to achieve the ideal texture.
Once the dough comes together, wrap it in plastic and chill it. This step is crucial for easy rolling and flaky layers. Trust me, patience here pays off!
Rolling Pin Tips and Tricks
When rolling out the dough, use a lightly floured work surface to prevent sticking. Roll the dough gently with a rolling pin, applying even pressure. Aim for a thickness of about 1/4 inch for the perfect balance of flakiness and structure.
If the dough cracks, don’t worry! Use trimmed pieces to patch it up. Shape the dough into neat rectangles by trimming irregular edges. This ensures even baking and a professional finish.
Finally, wrap the dough around the rolling pin for easy transfer to your baking sheet. This technique keeps the dough intact and saves time.
Crafting the Perfect Filling and Icing
Let’s dive into the heart of this recipe—the filling and icing that make it unforgettable. This step is where the magic happens, transforming simple ingredients into a symphony of flavors. With a few tips and tricks, you’ll create a treat that’s as delightful to make as it is to eat.
Balancing Brown Sugar and Cinnamon Flavors
The cinnamon filling is the star of the show. Start by combining light brown sugar, ground cinnamon, and a pinch of salt in a bowl. Mix until the texture resembles wet sand. This ensures the filling stays gooey without spilling out during baking.
For an extra layer of richness, add a touch of melted butter and a splash of vanilla extract. These ingredients enhance the warmth of the cinnamon and add depth to the flavor. Spread the filling evenly across the dough to ensure every bite is packed with sweetness and spice.

Achieving the Ideal Icing Consistency
Once your treats are baked and cooled, it’s time to make icing. In a clean bowl, whisk together powdered sugar, a splash of milk, and a hint of vanilla extract. The goal is a smooth, drizzle-ready consistency that’s not too thick or thin.
If the icing is too thick, add a teaspoon of milk at a time until it’s just right. For a glossy finish, let the icing set for 15 minutes before serving. This step ensures a professional look and locks in the flavors.
Incorporating a Touch of Butter and Vanilla
Butter and vanilla are the unsung heroes of this recipe. They add richness and complexity to both the filling and the icing. Use unsalted butter for better control over the flavor and a splash of pure vanilla extract for a subtle sweetness.
When spreading the filling, aim for an even layer to avoid air pockets. This ensures a consistent texture and flavor in every bite. For the icing, drizzle it generously but carefully to cover the surface without overwhelming the treat.
| Component | Key Ingredients | Tips |
|---|---|---|
| Filling | Light brown sugar, cinnamon, butter, vanilla | Mix until texture resembles wet sand |
| Icing | Powdered sugar, milk, vanilla | Whisk until smooth and drizzle-ready |
Attention to detail in this stage is crucial. Whether you’re spreading the filling or drizzling the icing, take your time to ensure a show-stopping result. Your efforts will pay off in every delicious bite!
Assembling Your Giant Pop Tart Masterpiece
Assembling this giant treat is where creativity meets precision—let’s get started! This step transforms your dough and filling into a stunning dessert that’s as beautiful as it is delicious. With a few simple techniques, you’ll create a masterpiece that’s sure to impress.
Layering the Dough with Filling
Start by rolling out your dough into two rectangles, each measuring about 12×16 inches. Place the first piece dough on a parchment-lined baking sheet. Spread the filling evenly, leaving a 1-inch edge around the sides. This ensures the filling stays inside during baking.
Next, carefully rectangle drape onto the filling by picking the short edge of the second dough piece. Gently lay it over the filling, aligning the edges as closely as possible. This step is crucial for a neat, professional finish.
Sealing the Edges with a Tine Fork
Once the dough is in place, it’s time to seal the edges. Use a tine fork to press down firmly along the perimeter. This not only prevents leakage but also adds a decorative touch. Make sure to press evenly to create a secure seal.
For extra flair, trim any excess dough with a sharp knife. This step ensures your treat looks polished and ready for the oven. Remember, patience and attention to detail make all the difference here!
| Step | Key Details |
|---|---|
| Layering | Spread filling evenly, leave 1-inch edge |
| Draping | Pick short edge, align dough carefully |
| Sealing | Use tine fork to press edges firmly |
Assembling this giant treat is as much an art as it is a science. Enjoy every moment of the process, and don’t forget to savor the results!
Baking Tips and Tricks for Brown Sugar Pop Tart Cookies
Baking is all about precision—let’s unlock the secrets to perfect results. Whether you’re a seasoned baker or just starting out, these tips will help you achieve bakery-quality treats every time. From temperature control to managing air pockets, I’ll guide you through the essentials.

Optimal Oven Temperature and Baking Time
Preheat your oven to 350°F for consistent results. This temperature ensures even baking and a golden finish. Bake your treats for 30 to 35 minutes, checking every minute after the 30-minute mark to avoid overbaking.
Chill the assembled tart in the dough refrigerator for at least 30 minutes before baking. This step prevents spreading and helps maintain the shape. Trust me, patience here pays off!
Managing Air Pockets and Achieving a Flaky Crust
Air pockets can ruin the texture of your crust. To avoid this, use a pin to create small steam vents on the surface. This allows steam to escape, ensuring a flaky, even bake.
Press the edges firmly with a fork to seal the dough. This not only prevents leaks but also adds a decorative touch. For extra flair, trim any excess dough with a sharp knife.
| Tip | Details |
|---|---|
| Oven Temperature | Preheat to 350°F for even baking |
| Baking Time | 30–35 minutes, check every minute |
| Chilling | 30 minutes in the dough refrigerator |
| Steam Vents | Use a pin to create small vents |
Follow these tips, and you’ll achieve a light, golden finish that’s as delightful to look at as it is to eat. Happy baking!
Serving Suggestions and Special Storage Advice
Presentation and storage are key to enjoying this treat to the fullest. Whether you’re serving it fresh or saving it for later, a little care goes a long way. Let’s explore how to make your creation shine and keep it tasting amazing.
Presentation Ideas for a Gourmet Finish
Elevate your dessert with simple yet stunning presentation ideas. Dust the top with a sprinkle of powdered sugar for a classic look. Add a drizzle of icing in a zigzag pattern for a professional touch. Garnish with fresh berries or mint leaves for a pop of color and freshness.
For a special occasion, slice it into neat portions and arrange them on a decorative platter. Pair it with a scoop of vanilla ice cream or a dollop of whipped cream for an indulgent twist. These small details make your treat look as good as it tastes!
Best Practices for Storing Leftovers
To keep your dessert fresh, wrap it tightly in plastic wrap or your wrap favorite reusable container. Store it at room temperature for up to three days. For longer storage, place it in a freezer-safe bag with parchment paper between layers.
When ready to enjoy, let it sit at room temperature for 10-15 minutes. If you prefer it warm, reheat it in the oven at 300°F for 5-7 minutes. This ensures the crust stays flaky and the filling stays gooey.
| Storage Method | Duration | Tips |
|---|---|---|
| Room Temperature | Up to 3 days | Wrap tightly in plastic wrap |
| Freezer | Up to 1 month | Use parchment paper between layers |
Don’t forget to share this masterpiece with friends and family. It’s a treat meant to be enjoyed together, bringing joy to every bite. Happy serving and storing!
Enjoy These Brown Sugar Pop Tart Cookies: A Perfect Blend of Nostalgia and Homemade Goodness
Baking this treat is more than just following a recipe—it’s about creating something truly special. From carefully rolling the whole rectangle of dough to perfecting the balance of flavors, every step is designed to bring joy to your kitchen. The use tine to seal edges and attention to the surface details ensure a professional finish.
I encourage you to experiment with ingredients like replace all-purpose flour for unique variations. Each piece of this process contributes to a delightful treat that’s perfect for sharing. The warmth of cinnamon and the flaky crust make every bite unforgettable.
Remember, baking is a journey. Take your time, enjoy the process, and don’t be afraid to make it your own. Whether you’re a seasoned baker or just starting out, this recipe is a celebration of creativity and passion. Share the joy of this tart with loved ones and savor the magic of homemade goodness!
FAQ
Can I replace all-purpose flour with another type of flour?
Yes, you can experiment with alternatives like whole wheat or gluten-free flour, but it may slightly alter the texture of the crust.
How do I prevent the filling from leaking out during baking?
Make sure to seal the edges tightly using a tine fork and avoid overfilling the center of the dough.
What’s the best way to roll out the dough evenly?
Use a rolling pin and lightly flour your work surface to prevent sticking. Roll gently from the center outward for an even rectangle.
Can I make the dough ahead of time?
Absolutely! Wrap the dough in plastic wrap and store it in the refrigerator for up to 2 days before using.
How do I achieve the perfect flaky crust?
Mix the dough on low speed to avoid overworking it, and keep the butter cold until baking for maximum flakiness.
What’s the ideal consistency for the icing?
The icing should be smooth and slightly thick—drizzle it over the cooled pastry for the best results.
Can I freeze the baked pop tart cookies?
Yes, wrap them tightly in plastic wrap or store them in an airtight container. They’ll stay fresh for up to a month in the freezer.
How do I prevent air pockets in the dough?
Use a fork to prick the dough lightly before baking, which helps release trapped air and keeps the crust flat.
What’s the best way to store leftovers?
Keep them in an airtight container at room temperature for up to 3 days, or refrigerate for longer freshness.