
Dessert time, but you want something way more fun than just another cake or pie? Then you HAVE to check out this Giant Cookie Pizza Recipe – Perfect for Dessert! Seriously, if you’re looking for a crowd-pleasing treat that’s guaranteed to be a hit at any gathering, your search is officially over. This isn’t just a cookie; it’s a dessert experience, combining the comforting flavors of classic chocolate chip cookies with the totally awesome, shareable fun of a giant pizza.
This Giant Cookie Pizza Recipe is my go-to for celebrations, game days, birthdays, cozy nights in – you name it, this dessert works. What I absolutely love about it is how ridiculously easy it is to make. You don’t need any fancy ingredients or complicated techniques; just a few pantry staples and a trusty pizza pan are all you need to whip up this showstopper in practically no time. The dough comes together in minutes – seriously, no chilling required! – making it the ultimate dessert solution for those busy days when you need something delicious fast.
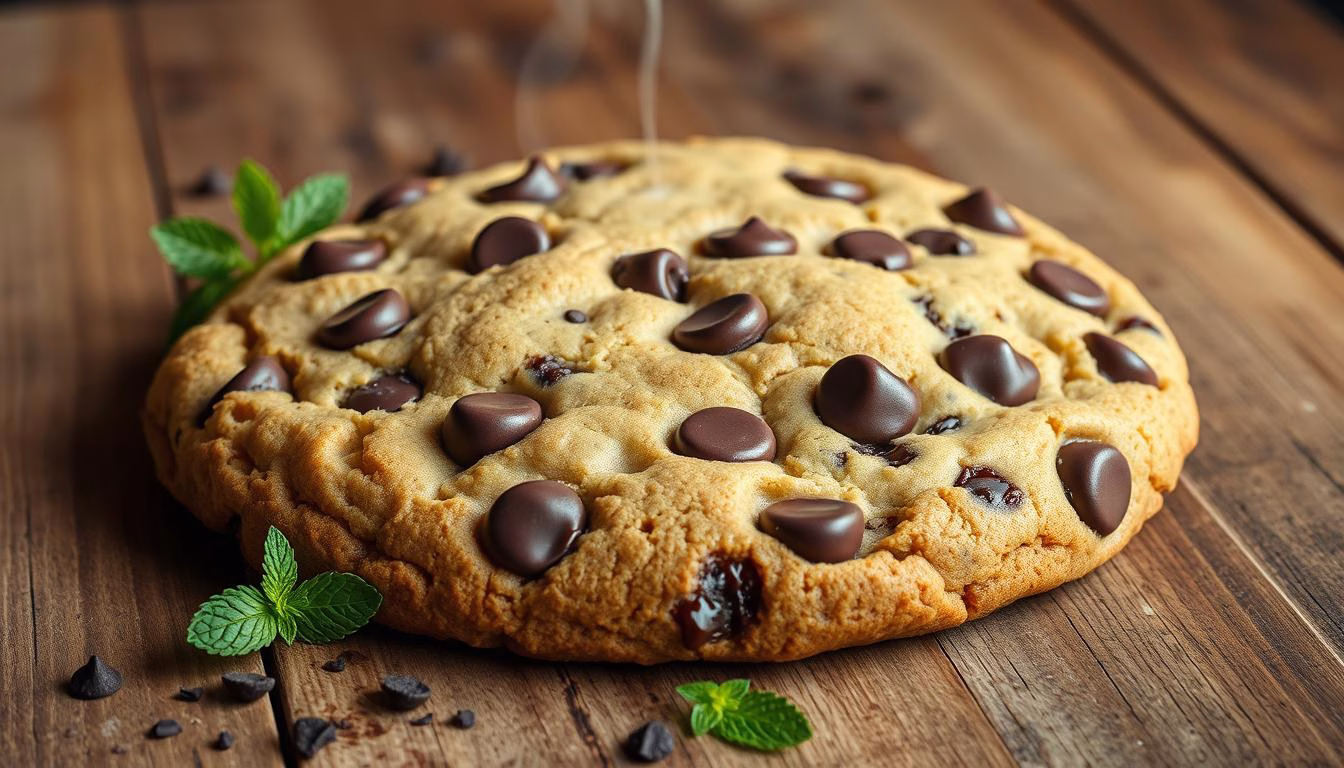
And then, the baking… oh, the aroma! As that cookie pizza bakes in the oven, the incredible smell of buttery dough and melting chocolate just fills your entire kitchen, promising deliciousness to come. The edges bake up all golden and irresistibly crisp, while the center stays perfectly soft and delightfully chewy. It’s that incredible texture combination, along with that classic chocolate chip cookie flavor, that makes this Giant Cookie Pizza so completely irresistible. Get ready to bake up some serious dessert fun – let’s get started!
Giant Cookie Pizza
Equipment
- Mixing bowl for preparing the cookie dough
- Electric mixer to cream butter and sugar
- Pizza Pan for baking the cookie base
- Spatula for spreading toppings
Ingredients
- 1 cup unsalted butter softened
- 1 cup granulated sugar
- 1 cup brown sugar packed
- 2 large eggs
- 1 tsp vanilla extract
- 3 cups all-purpose flour
- 1 tsp baking soda
- 1/2 tsp salt
- 2 cups chocolate chips
- 1 cup chocolate hazelnut spread for topping
- 1 cup fresh strawberries sliced, for topping
- 1/2 cup mini marshmallows for topping
- 1/2 cup chopped nuts for garnish
Instructions
- Preheat your oven to 350°F (175°C). Lightly grease a pizza pan.
- In a mixing bowl, cream together butter, granulated sugar, and brown sugar until light and fluffy using an electric mixer.
- Beat in the eggs and vanilla extract until well combined.
- In a separate bowl, whisk together flour, baking soda, and salt. Gradually add to the wet mixture until fully incorporated.
- Gently fold in the chocolate chips until evenly distributed.
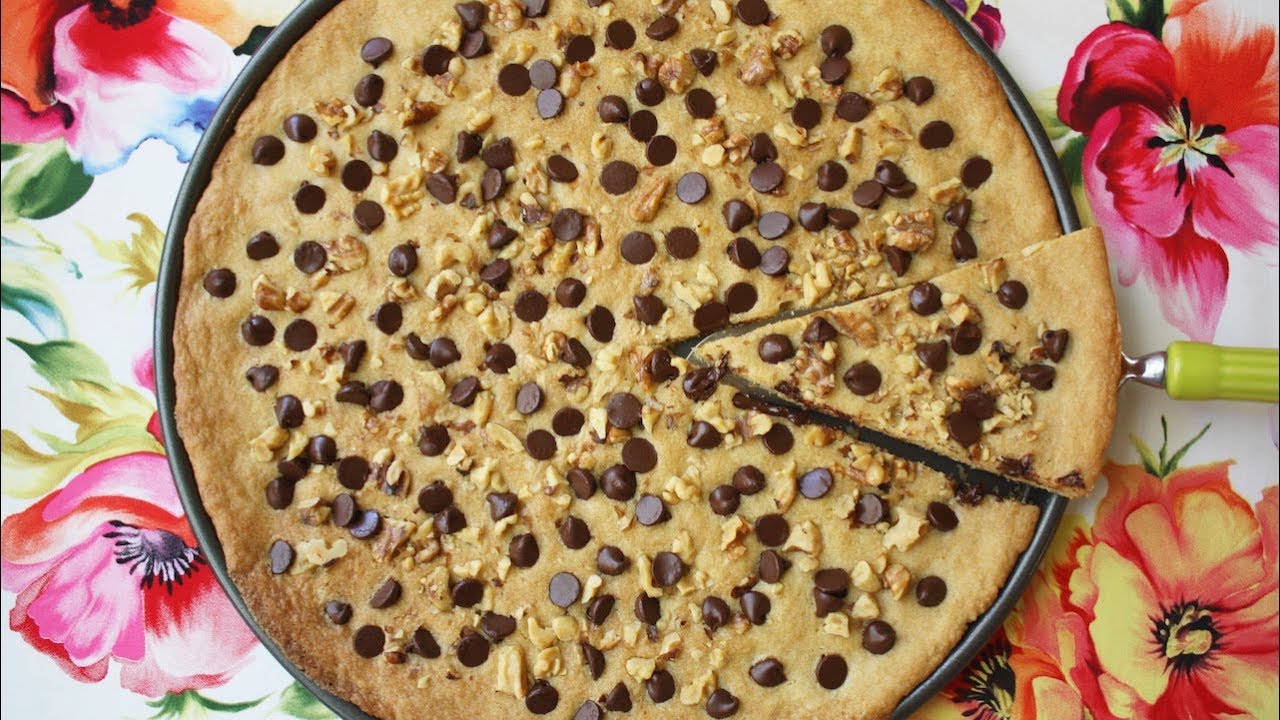
- Press the dough evenly onto the pizza pan and bake for 18-20 minutes or until golden brown. Let cool completely.
- Spread chocolate hazelnut spread over the cooled cookie. Top with sliced strawberries, mini marshmallows, and chopped nuts.
- Slice into wedges and serve immediately!
Notes
- Customization: Use white chocolate, peanut butter, or caramel drizzle for different flavor variations.
- Storage: Store leftovers in an airtight container at room temperature for up to 3 days.
- Party Tip: Let guests add their own toppings for a fun DIY dessert experience.
Nutrition
Introduction: A Crowd-Pleasing Dessert Twist
Imagine a dessert that combines the nostalgic charm of a classic treat with the excitement of a shared experience. That’s exactly what this chocolate chip dessert brings to the table. It’s a modern twist on traditional sweets, perfect for any occasion.
I first came up with this idea when I wanted to create something that could feed a crowd without sacrificing flavor. The result? A dessert that’s as fun to make as it is to eat. It’s become a staple at my family gatherings and parties, always leaving everyone asking for more.
What makes this recipe so special is its simplicity. With just a few basic ingredients and a trusty pizza pan, you can whip up a dessert that’s sure to impress. The dough comes together in minutes, and there’s no need to chill it—perfect for those busy days.
Once it’s in the oven, the aroma of buttery dough and melted chocolate fills the kitchen. The edges turn golden and crisp, while the center stays soft and chewy. It’s a texture combination that’s hard to resist!
This dessert isn’t just about taste; it’s about bringing people together. Whether it’s a birthday party or a casual get-together, it’s a guaranteed crowd-pleaser. Plus, it’s incredibly versatile—you can customize it with your favorite toppings or even pair it with a scoop of ice cream for an extra treat.
If you’re looking for a tried-and-true recipe, I highly recommend checking out this Ghirardelli chocolate chip cookie recipe. It’s the perfect base for this dessert and adds a rich, indulgent flavor.
This introduction is just the beginning. Stay tuned for a step-by-step guide with insider tips to make your dessert experience unforgettable!
Essential Ingredients and Kitchen Tools
Every great recipe begins with quality ingredients and the right equipment. For this chocolate chip dessert, I’ve carefully selected each component to ensure the best results. Let’s break it down into dry and wet ingredients, as well as the tools you’ll need.
Dry Ingredients and Mixers
The dry ingredients form the base of your dough. You’ll need:
- All-purpose flour: 2 ¾ cups for the perfect texture.
- Cornstarch: 1 teaspoon to keep it soft.
- Baking soda: 1 teaspoon for a slight rise.
- Salt: A pinch to balance the sweetness.
I recommend using a mixing bowl and a sturdy spatula to combine these evenly. A hand mixer can make this step quicker and easier.
Wet Ingredients and Special Add-ins
The wet ingredients bring richness and flavor. Here’s what you’ll need:
- Unsalted butter: 1 cup, softened to room temperature.
- Eggs: 2 large eggs for binding.
- Vanilla extract: 1 teaspoon for aroma.
- Sugar: A mix of brown and white sugar for sweetness and chewiness.
For the chocolate chips, I prefer semi-sweet ones with a cocoa content of 60-65%. They melt perfectly and add bursts of flavor in every bite.
Having the right tools is just as important. A 12-inch pizza pan ensures even baking, and a silicone spatula helps spread the dough smoothly. If you’re curious about other baking trends, check out these must-try cookie trends for 2025.
With these essentials, you’re ready to move on to the next step: preparing the dough. Let’s get started!
Step-by-Step Giant Cookie Pizza Preparation
Creating a dessert that’s both simple and impressive is easier than you think. This chocolate chip dessert is perfect for any occasion, and I’ll guide you through each step to ensure success. Let’s get started!
Mixing and Forming the Dough
Begin by preheating your oven to 350°F. Lightly grease your pizza pan or line it with parchment paper for easy removal later. In a large bowl, cream together the butter and sugars until light and fluffy. Add the eggs and vanilla, mixing until fully combined.
Gradually add the dry ingredients to the wet mixture, stirring until a soft dough forms. Fold in the chocolate chips for that classic flavor. Press the dough evenly into the pan, making sure to cover the edges completely.

Baking and Cooling Process
Bake the cookie pizza for 13-16 minutes, or until the edges are golden and the center is set. Keep an eye on it to avoid over-baking—this ensures a soft center with crisp edges. Once done, let it cool on a wire rack for at least 10 minutes before slicing.
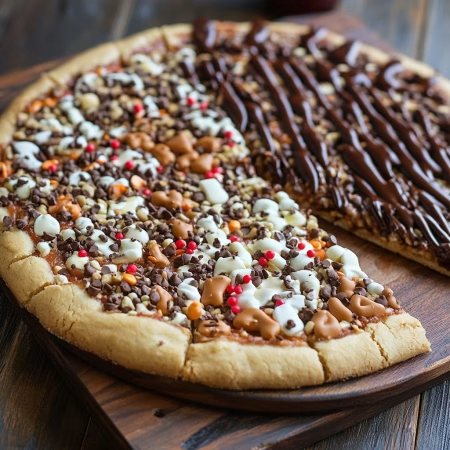
Decorating and Finishing Touches
While the dessert is still warm, gently press extra chocolate chips into the top for added indulgence. You can also drizzle melted chocolate or caramel for a decorative touch. Slice it into wedges and serve immediately for the best experience.
For more creative dessert ideas, check out these keto-friendly cookie recipes. They’re perfect for those looking for healthier options without sacrificing flavor.
Giant Cookie Pizza: The Ultimate Dessert Experience
Transform your dessert game with a treat that’s as versatile as it is delicious. This chocolate chip dessert isn’t just a recipe—it’s a canvas for creativity. Whether you’re hosting a party or simply craving something sweet, the possibilities are endless.
Variations and Customization Ideas
One of the best things about this dessert is how easy it is to customize. Swap out traditional chocolate chips for white chocolate, dark chocolate, or even peanut butter chips. Add a festive touch with colorful sprinkles or mix in chopped candy bars like Reese’s pieces or M&Ms for extra texture.
For a richer, chewy texture, try experimenting with different dough recipes. Adding a bit more brown sugar or using melted butter can make a big difference. The key is to have fun and make it your own!

Creative Serving Suggestions
Presentation is everything when it comes to desserts. Slice your cookie pizza into unique shapes or serve it on a decorative platter for a wow factor. Pair it with a scoop of ice cream to create a dessert pizza sundae that’s sure to impress.
Drizzle melted chocolate, caramel, or even peanut butter over the top for an indulgent finish. For a fun twist, try topping it with mini marshmallows or crushed nuts. Every bite will be a delightful surprise!
Looking for more inspiration? Check out these top cookie dough dessert recipes to explore even more creative ideas.
This dessert isn’t just about taste—it’s about creating memories. Whether it’s a birthday, game day, or holiday celebration, it’s a guaranteed crowd-pleaser. So, grab your pizza pan and let your imagination run wild!
Baking Tips and Expert Tricks
Mastering the art of baking doesn’t have to be complicated—here are my top tips to make your dessert experience smoother and more enjoyable. Whether you’re a beginner or a seasoned baker, these techniques will save you time and elevate your results.
Time-Saving Techniques
One of my favorite ways to speed up the process is using a stand mixer. It combines ingredients quickly and evenly, saving precious minutes. Pre-measuring your ingredients is another game-changer. It reduces prep time and minimizes mistakes.
Skip the chilling step if you’re in a hurry. While chilling can enhance flavor, this recipe works perfectly without it. Just make sure your butter is at room temperature for easy mixing.
Ingredient Substitutions and Enhancements
Experimenting with ingredients can take your dessert to the next level. For a richer flavor, try using salted butter instead of unsalted. If you’re out of chocolate chips, swap in peanut butter chips or chopped candy bars for a fun twist.
To achieve a chewy yet crisp texture, adjust your baking time. Start checking the edges at 13 minutes—they should be golden, while the center remains soft. For added sweetness, mix brown and white sugar in equal parts.
| Ingredient | Substitution | Effect |
|---|---|---|
| Unsalted Butter | Salted Butter | Adds a hint of saltiness |
| Chocolate Chips | Peanut Butter Chips | Introduces a nutty flavor |
| White Sugar | Brown Sugar | Enhances chewiness |
For more dessert inspiration, try this chocolate tiramisu. It’s a no-bake treat that’s perfect for any occasion. With these tips and tricks, you’ll be baking like a pro in no time!
Storing, Freezing, and Leftover Ideas
Keeping your dessert fresh and delicious is just as important as making it. Whether you’re saving it for later or planning to enjoy it over a few days, proper storage ensures it stays as good as the day you baked it. Here’s how to keep your chocolate chip cookie pizza tasting perfect every time.
Optimal Storage Solutions
After baking, let your dessert cool completely on a wire rack. This prevents condensation, which can make the edges soggy. Once cooled, wrap it tightly in plastic wrap or aluminum foil. Store it at room temperature for up to 2 days or in the fridge for up to 5 days. For longer storage, freezing is your best bet.
Freezing and Reheating Instructions
To freeze, slice your dessert into individual portions. Place parchment paper between slices to prevent sticking. Wrap each slice in plastic wrap, then place them in a freezer-safe bag or container. Frozen slices can last up to 3 months. When ready to enjoy, thaw them in the fridge overnight or reheat directly from frozen.
For reheating, use a preheated oven at 350°F for 10-12 minutes. This restores the crisp edges and soft center. Alternatively, microwave for 10-15 seconds for a quick fix. Avoid over-reheating to maintain the perfect texture.
| Storage Method | Duration | Tips |
|---|---|---|
| Room Temperature | 2 Days | Wrap tightly to retain freshness |
| Refrigeration | 5 Days | Use airtight containers |
| Freezing | 3 Months | Separate slices with parchment paper |
For creative leftover ideas, try turning your slices into a sundae by adding a scoop of ice cream or drizzling with caramel. You can also crumble them over yogurt for a fun twist. If you’re looking for more inspiration, check out these Valentine’s cookie ideas to keep your dessert game strong.
Avoid storing your dessert in its original pizza pan or cardboard box. These can trap moisture and lead to sogginess. Instead, use airtight containers or wrap it securely. With these tips, your chocolate chip cookie pizza will stay fresh and delicious, ready to enjoy whenever the craving strikes!
Wow Your Crowd with Cookie Pizza: Get the Recipe and Start Baking Big!
Bringing people together with a simple yet delightful treat is what baking is all about. This chocolate chip recipe is not just easy to make—it’s a guaranteed crowd-pleaser. With a few basic ingredients and a trusty pan, you can create a dessert that’s as fun to share as it is to eat.
Remember the key steps: mix the dough, press it into the pan, and bake until golden. Don’t forget to add your favorite toppings or drizzle with melted chocolate for a personal touch. The beauty of this recipe lies in its versatility—you can make it uniquely yours.
I’d love to see your creations! Share your photos and variations in the comments or on social media. Baking is all about creativity and connection, and this recipe is a perfect way to celebrate both.
Thank you for joining me on this baking journey. If you enjoyed this treat, stay tuned for more delicious ideas. Happy baking!
FAQ
Can I use a different type of pan for this recipe?
Absolutely! While a pizza pan works best for the classic shape, you can use a baking sheet or even a cast-iron skillet. Just make sure to adjust the baking time if needed.
How do I make the dough chewy instead of crispy?
For a chewier texture, use more brown sugar than white sugar and avoid overbaking. Pull it out of the oven when the edges are golden but the center is still slightly soft.
Can I add other mix-ins besides chocolate chips?
Definitely! Feel free to get creative with add-ins like peanut butter chips, chopped nuts, or even dried fruit. Just keep the total amount of mix-ins to about 1-2 cups.
How long does it take to cool before serving?
Let it cool for at least 15-20 minutes on the pan before slicing. This helps the dough set and makes it easier to cut into neat slices.
Can I make this recipe ahead of time?
Yes! You can prepare the dough a day in advance and store it in the fridge. When ready to bake, let it come to room temperature before spreading it on the pan.
What’s the best way to store leftovers?
Store leftovers in an airtight container at room temperature for up to 3 days. For longer storage, wrap slices tightly and freeze for up to 2 months.
Can I drizzle something on top for extra flavor?
Absolutely! A drizzle of melted chocolate, caramel, or even peanut butter adds a delicious finishing touch. Let it set for a few minutes before serving.
Can I use gluten-free flour for this recipe?
Yes, you can substitute with a 1:1 gluten-free flour blend. Just make sure it includes xanthan gum for the best texture.