
Mastering how to make cake art like the pros is an exciting journey that allows you to transform simple cakes into edible masterpieces. Whether you’re an enthusiastic home baker or dreaming of taking your skills to a professional level, learning the right techniques will set you on the path to creating stunning designs. With patience, practice, and the right tools, you can craft cakes that look as good as they taste.
In this guide, we’ll walk you through essential cake decorating techniques used by professionals, breaking them down into easy-to-follow steps. From mastering smooth buttercream finishes to intricate fondant work and elegant piping details, you’ll discover the secrets that bring cakes to life. Along the way, we’ll share insider tips, recommended tools, and common mistakes to avoid so you can build confidence in your cake decorating skills. Whether you’re designing a simple celebration cake or an elaborate showpiece, this guide will help you refine your craft and create cakes that truly impress.
For those looking to perfect their baking skills, check out our pro tips for baking perfectly fluffy cakes. This resource complements your journey into cake art, ensuring your creations are as delicious as they are beautiful.
Dreaming of making show-stopping cakes for special occasions? Learn from the pros at CakeFlix! They offer expert lessons on wedding cakes, birthday cakes, and more—plus a 7-day free trial to get started!

Understanding the Art of Cake Decorating
Cake decorating has transformed from simple frosting to intricate edible masterpieces. Over the years, this craft has evolved into a blend of creativity and precision, turning ordinary desserts into stunning works of art.
The Journey from Basic Cake to Edible Art
In the early days, cake decorating was about adding a layer of frosting or a few sprinkles. As time passed, bakers began experimenting with colors, textures, and designs. This trial-and-error process led to refined techniques that are now staples in the world of pastry.
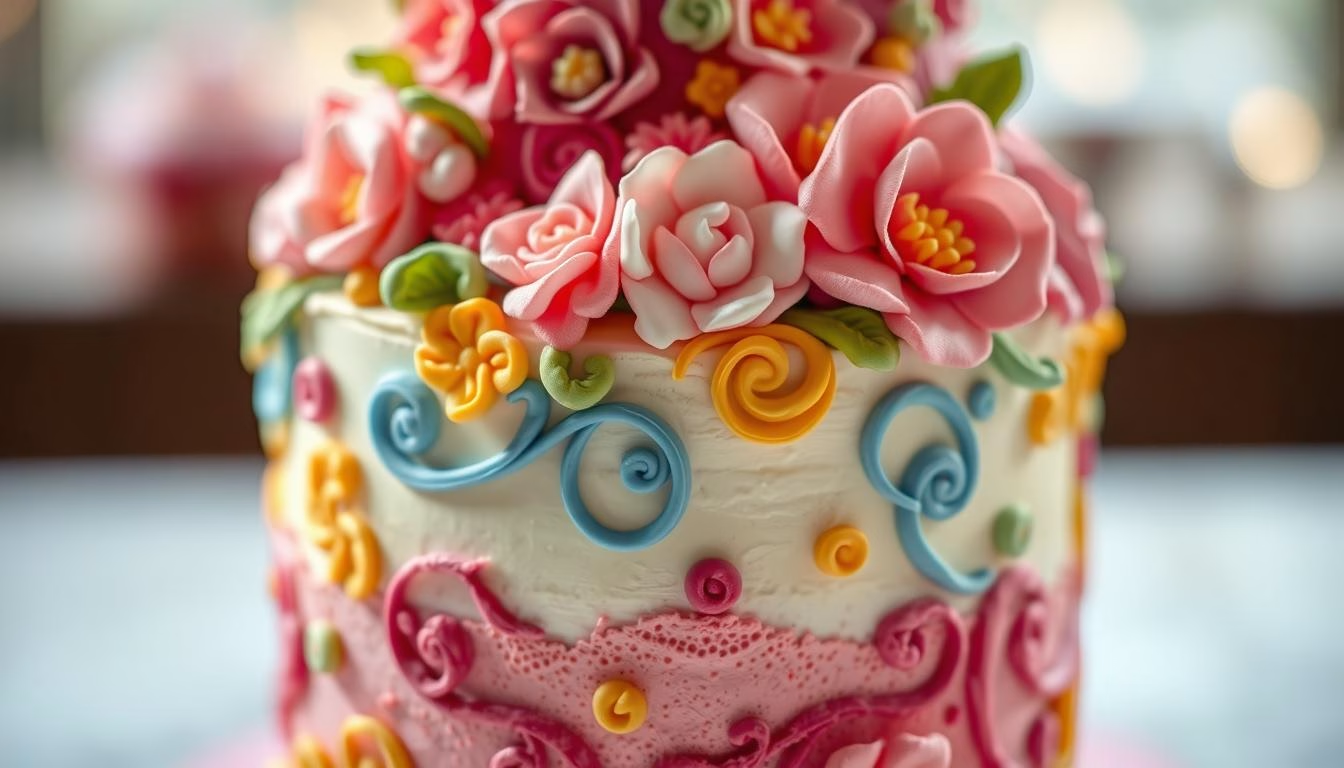
Today, cakes are more than just desserts. They are canvases for creativity, where every detail matters. From delicate piping to elaborate fondant sculptures, the possibilities are endless.
Exploring Cake Styles: Drip Cakes and Fondant Cakes
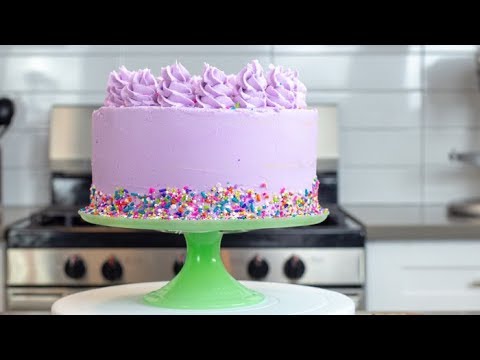
Modern cake decorating includes a variety of styles, each with its unique charm. Drip cakes, for instance, feature glossy ganache drips that add a touch of elegance. On the other hand, fondant cakes offer a smooth, polished finish, perfect for intricate designs.
Here’s a quick comparison of these two popular styles:
| Style | Key Features | Best For |
|---|---|---|
| Drip Cakes | Ganache drips, vibrant colors, playful designs | Birthdays, casual events |
| Fondant Cakes | Smooth finish, detailed sculpting, elegant designs | Weddings, formal occasions |
“Cake decorating is not just about taste; it’s about creating a visual experience that delights the senses.”
Understanding these fundamentals is essential for mastering advanced techniques. Whether you’re working with fondant or experimenting with drips, every detail contributes to the final masterpiece.
Gather Your Tools & Ingredients for Cake Making
Every great creation starts with the right tools and ingredients. Whether you’re a beginner or a seasoned baker, having the proper equipment ensures precision and consistency in your cake making journey. Let’s explore the essentials and optional supplies that can elevate your baking experience.
Essential Tools & Equipment
To achieve professional-quality results, you’ll need a few basic tools. Start with a set of mixing bowls in various sizes. These are perfect for combining dry and wet ingredients without spills. A sturdy spatula is another must-have for scraping batter and ensuring nothing goes to waste.
Measuring cups and spoons are crucial for accuracy. Baking is a science, and even a small deviation can affect the final product. A round cake pan, typically 8 or 9 inches in diameter, is ideal for creating evenly baked layers. Don’t forget parchment paper to prevent sticking and ensure easy removal.
For those looking to invest in specialty items, a stand mixer can save time and effort. It’s perfect for whipping cream, kneading dough, and mixing batter. A digital kitchen scale is another valuable addition, especially for recipes that require precise measurements by weight.

Optional Supplies for Creative Enhancements
Once you’ve mastered the basics, consider adding optional tools to your collection. A turntable makes decorating easier by allowing you to rotate the cake smoothly. Piping bags and tips are essential for intricate designs, from simple borders to detailed flowers.
Food coloring gels can transform plain frosting into vibrant hues, adding a pop of color to your creations. Edible glitter and sprinkles are fun additions for a festive touch. If you’re working with fondant, a rolling pin and smoothing tools will help achieve a polished finish.
Remember, while these supplies can enhance your designs, they’re not always necessary. Basic kitchen tools can often be substituted for specialty items. For example, a zip-top bag can work as a makeshift piping bag in a pinch.
“The right tools don’t just make the process easier—they inspire creativity and confidence in every baker.”
For a detailed list of must-have baking tools, check out our guide on essential baking tools. Whether you’re crafting a simple dessert or an elaborate masterpiece, having the right equipment ensures your cake making journey is both enjoyable and successful.
How To Make Cake Art
Mastering the foundation of cake art begins with a solid base and flawless layering. A well-prepared foundation ensures your dessert is not only visually stunning but also structurally sound. Let’s dive into the techniques that transform a simple cake into a work of art.
Preparing Your Cake Base and Layering Techniques
Start by baking a sturdy base. Use a reliable recipe and measure ingredients with precision. The right amount of flour, sugar, and leavening agents ensures a balanced texture. Once baked, let the layers cool completely before trimming for evenness.
Layering is a critical step. Apply a thin coat of buttercream between layers to act as glue. Use a turntable to rotate the cake while spreading frosting evenly. This technique ensures a smooth finish and prevents air pockets.

Creating the Perfect Buttercream and Ganache Finish
Buttercream and ganache are cornerstones of cake decorating. For a classic buttercream, whip softened butter until creamy, then gradually add powdered sugar and vanilla extract. Adjust the consistency with milk or cream for easy spreading.
For a rich ganache, heat heavy cream and pour it over finely chopped dark chocolate. Stir until smooth and let it cool to the desired thickness. A glossy ganache drip adds elegance to any dessert.
| Ingredient | Buttercream | Ganache |
|---|---|---|
| Base | Butter, powdered sugar, vanilla | Heavy cream, dark chocolate |
| Texture | Creamy, spreadable | Glossy, pourable |
| Best Use | Frosting, filling | Drips, glaze |
“The key to a flawless finish lies in patience and precision. Take your time to perfect each layer and coating.”
By following these steps and incorporating expert tips, you’ll elevate your cake decorating skills. Whether you’re crafting a simple dessert or an elaborate masterpiece, attention to detail ensures stunning results.
Techniques for Detailed Cake Decoration
Transforming a simple dessert into a masterpiece requires precision, creativity, and the right techniques. Detailed decoration elevates a decorated cake from ordinary to extraordinary. Let’s explore advanced methods that bring your designs to life.

Mastering Piping and Icing Tips for Stunning Designs
Piping is a cornerstone of decorating. Start by selecting the right tip for your design. A star tip creates rosettes, while a round tip is perfect for borders. Hold the pastry bag at a 45-degree angle and apply even pressure for consistent results.
For intricate patterns, practice with different tips. A petal tip, for example, helps craft delicate flower shapes. Experiment with pressure and speed to achieve varied textures. Remember, patience is key to mastering these techniques.
Using Food Coloring and Edible Decor to Enhance Presentation
Color plays a vital role in decorate cake designs. Use gel-based food coloring to achieve vibrant hues without altering the consistency of your buttercream. Start with a small amount and gradually add more until you reach the desired shade.
Edible decor like sprinkles, glitter, and fondant accents add a finishing touch. For a professional look, ensure decorations are evenly spaced and complement the overall design. A well-placed petal or scalloped border can make all the difference.
“The beauty of a decorated cake lies in the details. Every stroke of the piping bag and every sprinkle of color contributes to the final masterpiece.”
Here are some time-saving tips to streamline your process:
- Prepare all tools and ingredients before starting.
- Use a turntable for smooth, even application.
- Practice piping on parchment paper before applying to the cake.
By incorporating these techniques, you’ll create stunning designs that impress every time. Whether you’re crafting delicate petal shapes or vibrant borders, attention to detail ensures your decorated cake stands out.
🎉 Want to impress everyone with a cake just like this? CakeFlix offers a free 7-day trial with everything you need to get started!
Incorporating Fondant and Sculpting Methods
Fondant opens up a world of creative possibilities for cake decorators. This versatile medium allows you to achieve a smooth, polished finish and create intricate designs that elevate your creations. Whether you’re a beginner or a seasoned decorator, mastering fondant techniques is a valuable skill.
Applying Rolled Fondant Smoothly Over Your Cake
Start by kneading your fondant until it’s pliable and smooth. Dust your work surface with powdered sugar to prevent sticking. Roll it out evenly, ensuring it’s large enough to cover your cake completely.
Gently lift the rolled fondant and drape it over the cake. Use a smoothing tool to eliminate air bubbles and creases, working from the top down. Trim the excess for a clean edge. This technique, often taught in pastry class, ensures a flawless finish.
Sculpting Flowers, Petals, and Other Decorative Accents
Fondant is perfect for crafting delicate flowers and petals. Use specialty tools like cutters and veiners to shape your designs. For roses, roll small pieces into teardrops and layer them around a center bud.
Add texture with veiners or embossing tools. Let your creations dry slightly before attaching them to your cake. These techniques, practiced by professional decorators, bring a touch of elegance to any design.
“Fondant allows decorators to transform simple cakes into edible art. With patience and practice, anyone can master this medium.”
For more inspiration, explore our guide on creative cake toppings that complement fondant designs. Whether you’re crafting a simple dessert or an elaborate masterpiece, these techniques ensure stunning results.
Expert Tips from Professional Cake Decorators
Behind every stunning cake design lies a wealth of knowledge from seasoned decorators. In this article, we share insights from experts like Chef Gerri Sarnataro and lessons from top pastry programs. These tips will help you achieve consistent, beautiful results in your cake decorating journey.
Planning Your Design for Consistent Results
Planning is the foundation of successful cake decorating. Start by sketching your design or using digital tools to visualize the final result. This step ensures every element, from fondant accents to flower arrangements, aligns perfectly.
Consider the recipe and ingredients carefully. For example, using the right sugar ratio in buttercream ensures a smooth finish. A well-thought-out plan minimizes mistakes and saves time during execution.
Lessons Learned from Years in Cake Decorating
Professionals emphasize the importance of flexibility. Even with a detailed plan, unexpected challenges can arise. For instance, humidity can affect fondant texture. Adapting quickly is a skill honed through experience.
Another key lesson is the value of investing in quality tools. A good turntable or piping set can make a significant difference. As Chef Sarnataro notes,
“The right tool doesn’t just make the job easier—it inspires creativity.”
Specialized courses and programs also play a crucial role. These classes teach advanced techniques and provide hands-on practice. Whether it’s mastering vanilla buttercream or sculpting intricate flowers, continuous learning is essential.
For those exploring custom designs, our guide on personalized cakes offers inspiration and practical advice. By combining expert tips with a curious mindset, you’ll elevate your cake decorating skills to new heights.
Conclusion
Creating stunning desserts is a blend of skill, creativity, and patience. Throughout this article, we’ve explored the step-by-step process, from planning to execution, and highlighted essential tools like a scraper and ingredients such as vanilla. Attention to detail and effective time management are key to achieving professional results.
We encourage you to keep an account of your experiments and continuously refine your techniques at home. Every decorate cake project is an opportunity to create something unique and memorable. Whether you’re crafting a simple dessert or an elaborate masterpiece, the journey is as rewarding as the final product.
Join our community of passionate food enthusiasts and share your results. For more insights into cooking techniques, explore our guide on frying vs. baking. Apply these expert-led tips and transform your baking endeavors into edible art.
FAQ
What tools are essential for cake decorating?
Essential tools include a turntable, offset spatula, piping bags, tips, a bench scraper, and a fondant smoother. These basics help achieve professional results.
How do I create smooth buttercream finishes?
Start with a crumb coat, chill the cake, then apply a final layer of buttercream. Use a bench scraper or offset spatula for a sleek finish.
What’s the best way to color fondant for decorations?
Use gel food coloring for vibrant hues. Knead the color into the fondant gradually to avoid over-saturating and achieve even distribution.
Can I make drip cakes at home?
Absolutely! Use ganache or melted candy melts for the drip effect. Pour it over a chilled cake for clean, controlled drips.
How do I sculpt fondant flowers?
Roll fondant thinly, cut petal shapes, and layer them around a center. Use a ball tool to soften edges for a realistic look.
What’s the difference between ganache and buttercream?
Ganache is made from chocolate and cream, offering a rich, glossy finish. Buttercream combines butter, sugar, and flavorings, ideal for piping and smooth coatings.
How can I improve my piping skills?
Practice consistency with pressure and speed. Start with basic tips like round or star tips before moving to intricate designs.
What’s the best way to store a decorated cake?
Keep it in a cool, dry place. For fondant cakes, avoid refrigeration to prevent condensation. Buttercream cakes can be refrigerated but should be brought to room temperature before serving.