
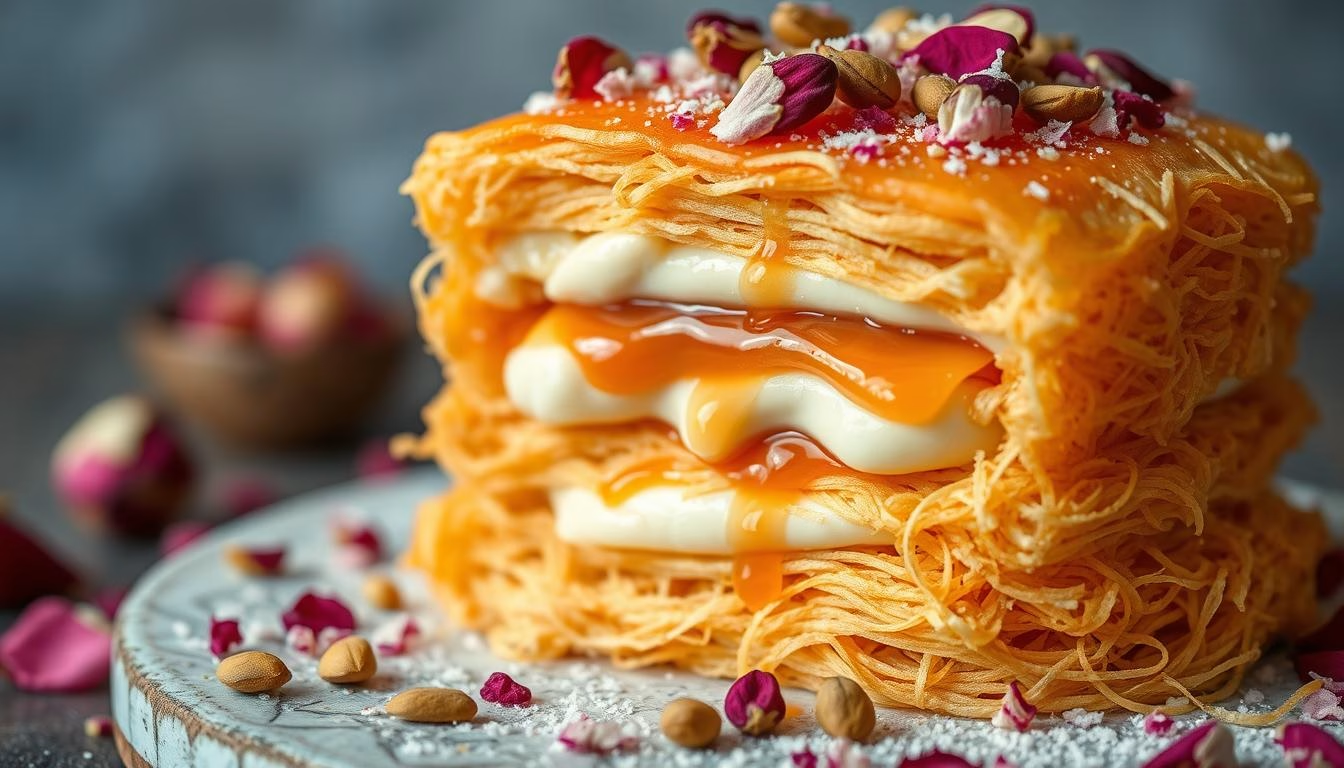
Kunafa is a beloved Middle Eastern dessert celebrated for its flaky, golden layers and rich, gooey cheese filling. Our Kunafa Tower Recipe brings this iconic treat to life with a step-by-step guide designed for home cooks. Using traditional ingredients like shredded kunafa dough, Akkawi cheese, and fragrant rosewater syrup, this recipe captures the authentic flavors and textures of the Levant while ensuring simplicity and success.
This dessert is as visually striking as it is delicious, with a crispy, caramelized exterior that contrasts beautifully with the melty, stretchy cheese inside. Our method streamlines the process, eliminating guesswork and delivering professional results in your own kitchen. Whether you’re hosting a gathering or simply craving a decadent treat, this Kunafa Tower Recipe guarantees a show-stopping centerpiece that’s sure to impress.
Perfect for both beginners and seasoned bakers, this recipe balances tradition with modern ease. Follow our detailed instructions to master the art of kunafa, from layering the dough to drizzling the syrup. With every bite, you’ll experience the harmony of sweet and savory, crispy and creamy—a true culinary gem that elevates any occasion. Get ready to indulge in a dessert that’s as rich in heritage as it is in flavor.

Kunafa Tower
Equipment
- Mixing bowl for combining kataifi dough and butter
- Baking Pans for baking kunafa layers
- Saucepan for making sugar syrup
Ingredients
- 1 lb kataifi (shredded phyllo dough) thawed if frozen
- 1 cup unsalted butter melted
- 1 lb sweet cheese (Nabulsi or Akkawi) desalted if necessary, shredded
- 1 cup sugar for syrup
- 1/2 cup water for syrup
- 1 tsp lemon juice for syrup
- 1 tsp rose water or orange blossom water optional, for syrup
- 1/2 cup crushed pistachios for garnish
Instructions
- In a saucepan, combine sugar and water. Bring to a boil, stirring until sugar dissolves. Add lemon juice and simmer for 10 minutes. Remove from heat, stir in rose water if using, and let cool.
- In a mixing bowl, toss shredded kataifi dough with melted butter until fully coated.
- Preheat oven to 350°F (175°C). Divide the kataifi dough into three equal portions. Press one portion into a greased baking pan, creating an even layer.
- Evenly distribute the shredded sweet cheese over the kataifi layer. Press lightly.
- Bake for 25-30 minutes, or until the kataifi is golden brown and crispy.
- Once baked, remove from the oven and carefully layer the kunafa rounds on top of each other to form a tower.
- While still warm, pour the prepared sugar syrup over the kunafa tower, allowing it to soak in.
- Sprinkle crushed pistachios on top and serve warm.
Notes
- Storage: Store leftover kunafa in an airtight container at room temperature for up to 2 days.
- Customization: Substitute sweet cheese with ricotta and mozzarella for a similar texture.
- Serving Tip: Enjoy with a scoop of vanilla ice cream for a rich contrast.
Nutrition
Introduction to the Delight of Middle Eastern Desserts
Middle Eastern desserts are a celebration of flavors, textures, and traditions. These treats are known for their perfect balance of sweetness and richness, often enhanced by aromatic ingredients like rose water and orange blossom. Each dessert tells a story of cultural heritage and culinary artistry.
One of the key elements in these desserts is the use of syrup, which adds moisture and sweetness without overwhelming the palate. Made from sugar, water, and aromatic essences, this syrup is poured over pastries to create a harmonious blend of flavors. The result is a dessert that’s both indulgent and refreshing.
Butter plays a crucial role in achieving the perfect texture. It’s used to coat shredded dough, ensuring a golden, crispy exterior. This technique not only enhances the flavor but also creates a delightful contrast with the soft, gooey filling inside.
Middle Eastern desserts are more than just sweet treats; they’re a reflection of history and culture. From festive occasions to family gatherings, these dishes bring people together. We’re passionate about exploring the science and stories behind these recipes, sharing our love for food with you.
| Ingredient | Role |
|---|---|
| Water | Base for syrup, balances sweetness |
| Syrup | Adds moisture and aromatic flavor |
| Sugar | Sweetens and enhances texture |
| Butter | Creates crispiness and distributes flavor |
History and Cultural Significance of Kunafa Tower
Rooted in history, this dish has become a symbol of celebration and togetherness. Its origins trace back to the Middle East, where it evolved into a beloved middle eastern dessert. Over time, it spread across regions like Turkey, Greece, and Palestine, each adding its unique twist while preserving the essence of the original.
Traditional recipes often feature aromatic ingredients like rose water and orange blossom. These elements infuse the pastry with a delicate floral scent, enhancing its appeal. The use of pistachios as a garnish not only adds a pop of color but also introduces a nutty crunch that complements the soft, gooey filling.
In Nablus, a city renowned for its culinary heritage, the dessert is made with goat cheese from nearby villages. This traditional method highlights the importance of local ingredients in creating authentic flavors. The dish’s cultural significance is further emphasized during festive occasions, where it brings people together to share in its richness.
Modern adaptations have introduced innovations like mozzarella, offering a new take on the classic recipe. Despite these changes, the soul of the dish remains intact. It continues to be a testament to the enduring legacy of Middle Eastern food culture.
For those looking to explore substitutes for key ingredients like orange blossom, we recommend checking out this guide on orange blossom water substitutes. It provides valuable insights into maintaining the authentic flavor profile of your creations.
| Ingredient | Cultural Role |
|---|---|
| Rose Water | Adds floral aroma, enhances sweetness |
| Orange Blossom | Infuses citrus notes, balances flavors |
| Pistachios | Garnish, adds texture and color |
| Goat Cheese | Traditional filling, rich and creamy |
Key Ingredients and Their Roles
Understanding the role of each ingredient is key to mastering this dish. From the crispy dough to the creamy cheese, every component plays a vital part in creating the perfect balance of flavor and texture. Let’s dive into the essentials that make this dessert unforgettable.
Dough and Cheese Essentials
The shredded dough, often called kataifi, is the foundation of this dessert. When combined with melted butter, it transforms into a golden, crispy layer that contrasts beautifully with the soft filling. The cheese is equally important, providing a rich, stretchy texture that defines the dish.
Traditional recipes use goat or mozzarella cheese, but the choice depends on your preference. Some opt for a mix of cheeses to enhance the creaminess. Adding a splash of milk can also help achieve the desired consistency, making the filling smooth and indulgent.
Syrup, Butter, and Garnishes
The syrup is what ties everything together. Made from sugar, water, and floral essences like rose or orange blossom, it adds moisture and sweetness without overpowering the dish. The key is to simmer it just long enough to achieve the perfect consistency.
Butter is another star ingredient. It coats the dough strands, ensuring they bake into a crispy, golden layer. Finally, garnishes like crushed pistachios or edible rose petals add a pop of color and texture, elevating the dessert’s presentation and flavor.
Essential Equipment and Tools
The right tools can make or break your baking experience. To create a perfectly layered and crispy dessert, you’ll need reliable equipment. Let’s explore the essentials that ensure success in every step of the process.
First, a well-functioning oven is crucial. Preheating your oven ensures even heat distribution, which is key to achieving a golden, crispy exterior. We recommend setting it to the right temperature before you start assembling your dish.

Next, a large bowl is essential for mixing ingredients. Whether you’re combining dough or preparing the filling, a sturdy bowl makes the process smooth and efficient. Pair it with a reliable pan for baking, ensuring your dessert cooks evenly.
For shredding the dough uniformly, a food processor is a game-changer. It saves time and ensures consistency, which is vital for the dish’s texture. Once the dough is ready, use your hand to press it evenly into the tray, creating those perfect layers.
Here’s a quick overview of the tools and their roles:
| Tool | Role |
|---|---|
| Oven | Ensures even baking and crispiness |
| Bowl | Mixes ingredients efficiently |
| Pan | Provides even heat distribution |
| Tray | Holds layers for baking |
| Food Processor | Shreds dough uniformly |
| Hand | Presses layers evenly |
Investing in quality tools not only simplifies the process but also elevates the final result. With the right equipment, you’re one step closer to mastering this iconic dessert.
How to Prepare Your Ingredients
Preparing ingredients is the foundation of any great dish, and this dessert is no exception. Proper prep ensures that every component works together seamlessly. Let’s break down the steps to get your ingredients ready for baking.
Thawing and Processing the Kataifi Dough
Start by thawing the frozen kataifi dough. Leave it at room temperature for about 30 minutes. This ensures the dough retains its texture and is easy to work with. Once thawed, use a food processor to break it into even strands. This step is crucial for achieving a uniform, crispy layer.
Prepping Cheese and Simple Syrup
For the cheese, shred or dice it into small pieces. If using mozzarella, pat it dry to remove excess moisture. This helps maintain the filling’s consistency. For the simple syrup, combine sugar and water in a saucepan. Simmer for 10 minutes until it thickens slightly. Add a splash of lemon juice for balance.
Keep all ingredients at room temperature during prep. This ensures even baking and mixing. Proper preparation sets the stage for a dessert that’s both visually stunning and delicious.
| Ingredient | Preparation Step |
|---|---|
| Kataifi Dough | Thaw, process into strands |
| Cheese | Shred or dice, pat dry |
| Simple Syrup | Simmer sugar and water |
For more tips on working with traditional ingredients, check out our guide on pistachio halva. It’s a great resource for mastering Middle Eastern desserts.
Kunafa Tower Recipe
Creating the perfect layered dessert requires precision and attention to detail. Let’s walk through the process of assembling and baking this iconic treat, ensuring every bite is a blend of crispy pastry and gooey cheese.
Assembling Your Dessert Layers
Start by preparing your pan. Grease it lightly to prevent sticking. Take half of the shredded dough and spread it evenly across the bottom. Use a cup or your hand to press it down firmly, creating a compact base.
Next, add the cheese filling. Spread it evenly, ensuring it reaches the edges. This step is crucial for achieving that signature stretchy texture. Top it with the remaining dough, pressing gently to seal the layers together.
Baking and Finishing Touches
Preheat your oven to the recommended temperature. Place the tray inside and bake for the specified bake minute duration. Keep an eye on it to ensure the top turns golden brown without burning.
Once baked, remove it from the oven and immediately pour the sugar syrup over the top. This step locks in moisture and enhances the dessert’s sweetness. Garnish with crushed pistachios for a pop of color and texture.
Follow these steps carefully, and you’ll achieve a dessert that’s both visually stunning and irresistibly delicious.
Expert Tips for Perfect Texture and Flavor
Mastering the perfect texture and flavor of this dessert requires attention to detail and a few expert tricks. Small adjustments in baking and syrup preparation can make a big difference in the final result. Let’s explore how to achieve that golden, crispy exterior while keeping the filling soft and gooey.
Adjusting Baking Time and Temperature
Baking is a science, and even a slight change in time or temperature can alter the texture. Preheat your oven to 350°F (180°C) for even heat distribution. Keep a close eye on the dessert during the last few minutes of baking. A golden brown top is your cue to remove it from the oven.
“An extra minute can turn crispy into burnt,” says one expert. To avoid this, set a timer and check the dessert frequently. If the edges darken too quickly, reduce the temperature by 10°F and extend the baking time slightly. This ensures the cheese filling stays creamy while the exterior remains crisp.
Enhancing the Syrup for Extra Sweetness
The sugar syrup is the finishing touch that ties everything together. To enhance its flavor, add a splash of lemon juice while simmering. This balances the sweetness with a subtle tang, creating a more complex taste profile.
Simmer the syrup for about 10 minutes until it thickens slightly. Let it cool for at least 10 minutes before pouring it over the baked dessert. This allows the syrup to absorb evenly, ensuring every bite is perfectly sweetened.
Follow these instructions carefully, and don’t be afraid to experiment within safe limits. Whether you’re adjusting the bake minute or tweaking the syrup, these tips will help you create a dessert that’s both authentic and tailored to your taste.
Storage, Reheating, and Make-Ahead Options
Preserving the perfect texture and flavor of your dessert is just as important as the baking process itself. Whether you’re saving leftovers or planning ahead, these tips ensure your dish stays as delicious as the day it was made.
Proper Storing Techniques for Leftovers
To keep your dessert fresh, store it in an airtight container. This locks in moisture and prevents the pastry from becoming soggy. For best results, place it in the refrigerator within an hour of baking.
If you’re storing it for more than a day, add a paper towel to absorb excess moisture. This helps maintain the crispy texture. When ready to serve, let it sit at room temperature for about 30 minutes to enhance its flavor.

Freezing and Reheating Guidelines
For longer storage, freezing is a great option. Wrap individual portions in plastic wrap and place them in a freezer-safe container. Your dessert can stay fresh for up to a month this way.
When reheating, the oven is your best bet. Preheat it to 350°F (180°C) and bake for 10-15 minutes. This restores the crispy exterior while keeping the filling gooey. Avoid the microwave, as it can make the pastry soft.
For make-ahead options, assemble the layers and freeze them unbaked. When ready to bake, simply add the syrup and garnish. This method saves time without compromising quality.
| Method | Guidelines |
|---|---|
| Refrigeration | Store in an airtight container for up to 3 days |
| Freezing | Wrap portions and freeze for up to 1 month |
| Reheating | Oven at 350°F for 10-15 minutes |
Creative Variations and Optional Add-Ins
Exploring new flavors can transform a classic dish into something extraordinary. By incorporating fresh ingredients and innovative techniques, you can create a dessert that’s both familiar and exciting. Let’s dive into some creative twists that will elevate your next creation.
Flavor Enhancements with Citrus and Spices
Adding citrus and spices can bring a refreshing twist to your dessert. Fresh orange juice and zest introduce a bright, tangy flavor that pairs beautifully with the sweetness of the syrup. A hint of cardamom adds warmth and depth, while a touch of rose water enhances the floral aroma.
For a vitamin-rich boost, consider incorporating pomegranate seeds or a drizzle of lemon juice. These additions not only enhance the flavor but also add a pop of color, making your dessert visually appealing.
Innovative Serving Suggestions
Presentation is key to making your dessert stand out. Instead of the traditional large piece, try serving it in bite-sized portions. Mini rolls or small cake-like slices are perfect for parties or casual gatherings.
Another idea is to layer the dessert in individual jars or glasses. This not only looks elegant but also allows for easy portion control. Garnish with crushed pistachios or edible rose petals for a finishing touch.
By experimenting with these variations, you can create a dessert that’s uniquely yours. Whether you’re adding a splash of orange blossom water or serving it in a new size, these ideas will inspire you to think outside the box.
Substitutions and Dietary Modifications
Adapting traditional recipes to meet dietary needs is easier than you might think. With a few simple swaps, you can enjoy this dessert regardless of restrictions. Whether you’re vegan, lactose-intolerant, or managing allergies, we’ve got you covered.
Vegan and Allergy-Friendly Alternatives
For those avoiding dairy, ghee can be replaced with vegan butter. This swap maintains the rich, nutty flavor essential to the pastry. Similarly, traditional milk-based cheese can be substituted with non-dairy alternatives like cashew or almond-based options.
When it comes to the cheese layer, dairy-free cream ensures a luxurious texture. Adjust the sugar ratio slightly to balance the sweetness, especially if using alternative ingredients. These changes allow you to tailor the recipe without compromising its original appeal.
For the dough, ensure it’s free from allergens by checking labels or making it from scratch. Many brands offer gluten-free or nut-free options, making it accessible for everyone. With careful attention to ingredient choices, you can create a dessert that’s both inclusive and delicious.
Here’s a quick guide to substitutions:
| Ingredient | Alternative |
|---|---|
| Ghee | Vegan butter |
| Milk-based cheese | Cashew or almond cheese |
| Cream | Dairy-free cream |
| Sugar | Adjust ratio for balance |
By following these guidelines, you can enjoy a dessert that’s as flavorful and satisfying as the original. Experiment with different combinations to find what works best for your dietary needs.
Conclusion
This iconic dish brings together centuries of tradition and modern culinary techniques. We’ve shared the steps to create a dessert that’s both authentic and accessible, ensuring every hand can craft it with confidence. From preparing the ingredients to mastering the baking time, each step plays a vital role in achieving the perfect balance of flavors and textures.
We encourage you to explore variations while honoring its cultural roots. Whether you’re using a traditional tray or experimenting with new ingredients, the essence of this food remains unchanged. It’s a celebration of heritage and creativity, inviting you to make it your own.
Join our community and share your experiences. Your feedback helps us continue to celebrate and preserve the rich traditions behind this beloved dessert. Together, we can keep the story alive, one delicious bite at a time.
FAQ
What type of cheese works best for this dessert?
We recommend using akawi or mozzarella cheese for their perfect melt and mild flavor. These cheeses balance the sweetness of the syrup beautifully.
Can I make the syrup ahead of time?
Absolutely! The sugar syrup can be prepared in advance and stored in an airtight container at room temperature for up to a week. This saves time during prep.
How do I prevent the pastry from drying out while baking?
Ensure the kataifi dough is evenly coated with ghee or butter before baking. This locks in moisture and creates a golden, crispy texture.
Can I use a different type of syrup?
Yes! While traditional rose water or orange blossom syrup is classic, you can experiment with lemon juice or honey for a unique twist.
How long should I bake the dessert for the perfect texture?
Bake at 350°F (175°C) for 30-40 minutes until the top is golden brown. Adjust the time slightly based on your oven’s performance.
Can I freeze leftovers?
Yes, you can freeze leftovers in an airtight container for up to a month. Reheat in the oven at 300°F (150°C) for the best results.
What’s the best way to serve this dessert?
Serve warm with a drizzle of syrup and a sprinkle of crushed pistachios. Pair it with a cup of tea or coffee for a complete experience.
Are there vegan alternatives for this recipe?
Yes! Substitute vegan cheese and plant-based butter to create a dairy-free version. Use agave syrup instead of sugar syrup for a vegan-friendly option.
Can I add other flavors to the syrup?
Definitely! Enhance the syrup with citrus zest, cinnamon, or vanilla extract for added depth and aroma.
What’s the secret to achieving the perfect layered texture?
Press the dough firmly into the pan to create even layers. This ensures a balanced bite with the right mix of crispy and creamy textures.