
Imagine a dessert that combines flaky layers with a rich, buttery finish—this is what makes this creation stand out. Crafted with precision, it blends traditional techniques with modern twists, ensuring every bite is a delight. The secret lies in the careful balance of ingredients like softened butter and yogurt, which add both flavor and texture.
What sets this apart is its attention to detail. From exact measurements to the perfect mix of warm ingredients, every step is designed to achieve a light, fluffy result. Whether you’re a seasoned baker or just starting, this method brings urban sophistication to your kitchen.
For those looking to elevate their baking game, check out these genius pastry hacks. They’ll help you master the art of creating consistently perfect treats. Ready to dive in? Let’s get started on this culinary journey.
Pastry Cake
Equipment
- Baking sheet lined with parchment paper
- Rolling Pin for rolling pastry if needed
- Whisk for preparing cream filling
- Refrigerator for chilling the cake
Ingredients
- 2 sheets puff pastry thawed
- 1 cup heavy cream cold
- 0.5 cup powdered sugar
- 1 tsp vanilla extract
- 2 tbsp butter melted, for brushing
- 2 tbsp strawberry jam or any fruit jam
- 2 tbsp powdered sugar for dusting
Instructions
- Preheat oven to 375°F (190°C) and line a baking sheet with parchment paper.
- Roll out the puff pastry sheets slightly if needed. Place on the prepared baking sheet and brush with melted butter.
- Bake for 18-20 minutes, or until golden and puffed. Let cool completely.
- In a mixing bowl, whisk heavy cream, powdered sugar, and vanilla extract until soft peaks form.
- Spread a layer of jam over one pastry sheet, then spread the whipped cream over it. Place the second pastry sheet on top.
- Refrigerate for at least 1 hour to allow the flavors to set.
- Dust with powdered sugar, slice, and serve.
Notes
- Optional Equipment: A serrated knife helps slice the pastry without crushing it.
- Customization: Add fresh berries or chocolate ganache between the layers.
- Storage: Keep in the refrigerator for up to 3 days.
- Serving Tip: Let sit at room temperature for 5 minutes before serving for the best texture.
Nutrition
Introduction to the Ultimate Pastry Cake Recipe
Discover the secret to a dessert that’s both indulgent and elegant. This recipe combines advanced techniques with everyday ingredients, creating a treat that’s as impressive as it is delicious. Whether you’re a seasoned baker or just starting, this guide will walk you through every step with clarity and confidence.
What Makes This Recipe Special
This method stands out in the world of baking for its meticulous attention to detail. By creaming sugar with butter, eggs, and yogurt, you create a stable yet indulgent base. Each ingredient is carefully chosen to enhance flavor and texture, ensuring a result that’s both light and rich.
From whipping the batter to layering the flaky dough, every step is designed to maximize taste and structure. The interplay between crispy puff pastry and creamy filling transforms this dessert into an edible work of art.
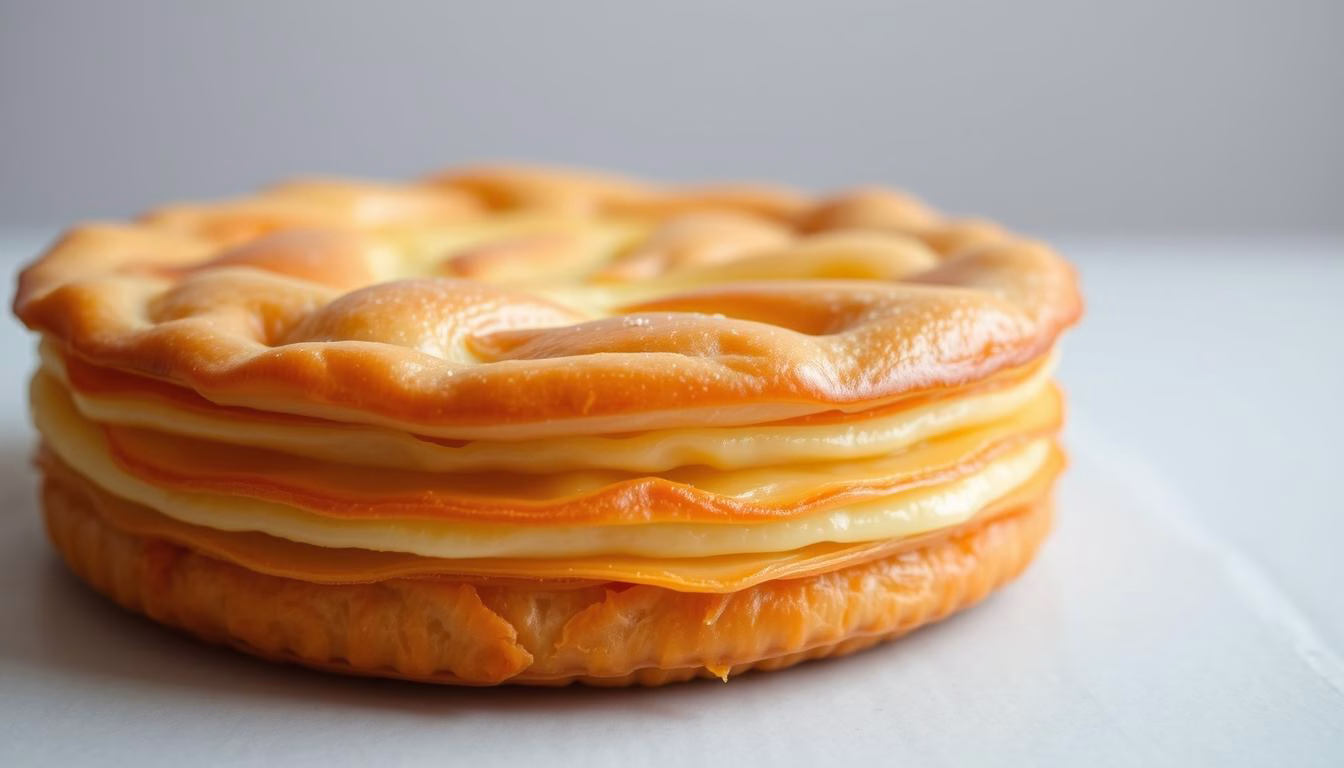
Overview of Flaky and Buttery Textures
The key to this recipe lies in its textures. The flaky layers are achieved through precise folding and chilling techniques, while the buttery richness comes from high-quality ingredients. Here’s a breakdown of what makes these textures so unique:
| Texture | Key Ingredient | Technique |
|---|---|---|
| Flaky | Cold Butter | Layering and Folding |
| Buttery | Softened Butter | Creaming Method |
For more tips on achieving perfect textures, check out these pro tips for fluffy cakes. They’ll help you master the art of baking with confidence and creativity.
The Origins and Inspiration Behind Pastry Cakes
Uncover the roots of a beloved creation that has evolved across cultures. This dessert is more than just a treat—it’s a testament to centuries of culinary artistry. From French patisseries to Russian tea rooms, its journey is as rich as its flavors.
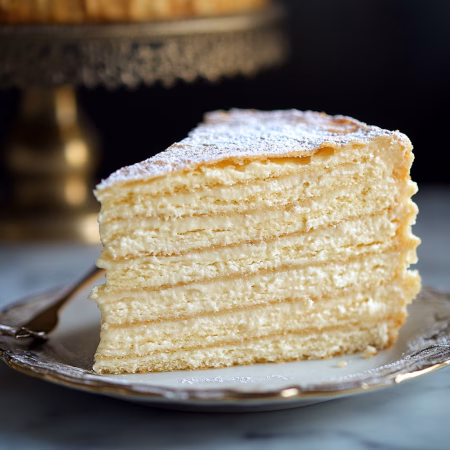
Traditional French and Russian Influences
The French Mille-feuille and the Russian Napoleon are iconic examples of this dessert’s storied lineage. Both styles emphasize flaky layers and creamy fillings, showcasing the artistry of their respective cultures. The French perfected the technique of layering dough, while the Russians added their own lavish twist with rich custards.
These traditions highlight how baking has always been about precision and creativity. The French focused on elegance, while the Russians embraced indulgence. Together, they created a dessert that’s celebrated everything from grand feasts to cozy family gatherings.
Modern Baking Twists
Today, this dessert continues to evolve, blending classical methods with contemporary flair. Modern bakers experiment with accessible techniques to fill the gap between tradition and innovation. From using alternative ingredients to incorporating global flavors, the possibilities are endless.
This evolution proves that baking is not just about following recipes—it’s about pushing boundaries. Whether it’s a quick weeknight treat or a show-stopping centerpiece, this dessert remains a symbol of creativity and heritage.
Understanding the Essentials: Ingredients Breakdown
Every great creation starts with the right ingredients. In the world of baking, the quality and precision of these elements can make or break your final product. Let’s dive into the building blocks that ensure your dessert turns out spectacularly, every time.
Butter, Flour, and Egg Yolks Explained
Butter is the heart of any flaky masterpiece. Its fat content creates layers that puff up beautifully when baked. For the best results, use high-quality, unsalted butter. This allows you to control the saltiness of your dessert.
Flour provides the structure. All-purpose flour is a versatile choice, but cake flour can add extra tenderness. The key is to measure accurately. Too much flour can make your creation dense, while too little can leave it flat.
Egg yolks are the secret to a rich, creamy filling. They add richness and stability to your pastry cream. Always use fresh eggs for the best texture and flavor.
“Precision in ingredients is the difference between good and great. Every gram counts.”
Here’s a quick breakdown of how these ingredients work together:
| Ingredient | Role | Tip |
|---|---|---|
| Butter | Creates flaky layers | Keep it cold for puff pastry |
| Flour | Provides structure | Measure carefully |
| Egg Yolks | Adds richness | Use fresh eggs |
Understanding these essentials ensures your dessert is crispy yet tender, with a perfect balance of flavors. Whether you’re working with puff pastry or crafting a rich pastry cream, the quality of your ingredients is non-negotiable.
Step-by-Step Pastry Cake Recipe: Flaky and Buttery Layers (pastry cake Recipe)
Transform simple ingredients into a show-stopping dessert with these steps. This recipe ensures flaky layers every time, combining precision with creativity. Whether you’re a seasoned baker or a beginner, these techniques will elevate your skills.
Detailed Mixing and Baking Procedures
Start by creaming softened butter and sugar until light and fluffy. This step is crucial for creating a stable base. Add eggs one at a time, ensuring each is fully incorporated. A splash of yogurt adds moisture and richness to the batter.
Next, fold in the flour gently. Overmixing can lead to dense results. The key is to mix just until combined. This ensures a tender crumb while maintaining the flaky texture.
- Roll out the dough evenly. Use a ruler for precision.
- Chill the dough for at least 30 minutes. This prevents shrinkage during baking.
- Bake at 400°F for 20 minutes. Watch for a golden-brown finish.
Once baked, let the layers cool completely. This prevents the cream from melting. Spread a generous layer of cream between each sheet. Each layer adds a satisfying crunch, making every bite irresistible.
“Baking is both an art and a science. Precision in each step ensures perfection.”
Finally, chill the assembled dessert for at least an hour. This allows the flavors to meld and the layers to set. The result? A dessert that’s as visually stunning as it is delectably textured.
Preparing Your Ingredients and Equipment
Mastering the art of baking starts with the right tools and preparation. Whether you’re crafting a flaky masterpiece or a creamy delight, having the essentials on hand ensures a smooth process. From precise measurements to efficient setups, every detail matters.
Essential Baking Tools
Equip your kitchen with the must-haves for flawless results. A digital kitchen scale ensures accuracy, especially when measuring flour or sugar. Use a silicone baking mat to prevent sticking and simplify cleanup. For even layers, invest in a cake leveler and matching cake boards.
Don’t forget the basics: measuring cups and spoons for both dry and liquid ingredients. A stand mixer or electric hand mixer saves time and effort, while a cooling rack ensures your creation cools evenly. For more insights, check out these 10 essential baking tools.
Pre-measurement and Setup Tips
Pre-measure your ingredients to save time and avoid mistakes. Use separate bowls for wet and dry components. Sift flour to remove lumps and aerate it for a lighter texture. Room-temperature ingredients, like butter and eggs, mix more evenly.
Organize your workspace for efficiency. Keep your tools within reach and preheat your oven for 10-15 minutes. Use an oven thermometer to ensure accuracy. With everything in place, you can focus on the artistry of baking rather than guesswork.
Mixing and Folding: Creating the Perfect Dough
The art of baking lies in the delicate balance of mixing and folding. Achieving the right consistency requires precision, patience, and a deep understanding of how ingredients interact. Whether you’re a novice or a seasoned baker, mastering these techniques is the key to creating flaky, buttery layers that stand out.
Techniques for a Smooth Batter
Mixing is more than just combining ingredients—it’s about creating harmony. Start by sifting flour to remove lumps and aerate it. This ensures a lighter texture. Add egg yolks one at a time, mixing gently to avoid overworking the dough. Overmixing can lead to a dense result, losing the flaky layers you’re aiming for.
Folding is equally crucial. Use a silicone spatula to gently lift and turn the mixture. This technique retains air, ensuring a light and airy texture. Stop folding as soon as the batter is no longer streaky. Overfolding can reduce the desired lightness by up to 15%.
“Folding is not just a technique—it’s a philosophy. Every motion matters.”
For best results, let the dough rest for at least one hour. This allows the gluten to relax, making it easier to roll out and shape. Chilling the dough also prevents shrinkage during baking, ensuring sharp edges and even layers.
When it comes to mixing methods, there’s a debate between traditional manual folding and modern mixer techniques. Manual folding offers more control, allowing you to feel the dough’s consistency. Mixers, on the other hand, save time but require careful monitoring to avoid overmixing.
Here’s a quick guide to mastering the perfect dough:
- Sift flour and add egg yolks gently.
- Fold the mixture using a silicone spatula.
- Let the dough rest for one hour before shaping.
By following these steps, you’ll create a dough that’s smooth, cohesive, and ready to transform into a flaky masterpiece. The key is to respect the process—every fold, every mix, and every moment of rest contributes to the final result.
Crafting the Ultimate Pastry Cream
The secret to a velvety, indulgent filling lies in mastering the art of pastry cream. This luxurious custard is the backbone of countless desserts, offering a rich, smooth texture that complements flaky layers. Achieving perfection requires precision, patience, and a few expert techniques.
Key Techniques for a Thick Custard
Start by measuring your ingredients to the exact gram. Precision is non-negotiable when it comes to creating a stable custard. Combine egg yolks with sugar, whisking until the mixture is pale and thick. This step ensures a smooth, emulsified base.
Heat your milk just until it begins to steam, then slowly pour it into the egg mixture while whisking constantly. Return the mixture to the stove and cook over medium-low heat, stirring until it thickens. The key is to avoid boiling, which can cause the custard to curdle.
Preventing Skin Formation
Once your custard is ready, transfer it to a bowl and immediately cover it with plastic wrap. Press the wrap directly onto the surface of the cream to prevent air exposure. This simple trick stops skin from forming, ensuring a silky texture.
For faster cooling, place the bowl in an ice bath. Once chilled, your custard is ready to use or store. Properly made pastry cream can elevate any dessert, adding layers of flavor and indulgence.
“The difference between good and great pastry cream lies in the details. Every gram, every whisk, and every moment of care counts.”
Baking Tips for Achieving a Flaky and Crisp Texture
Perfecting the art of baking requires more than just ingredients—it’s about precision and timing. Whether you’re aiming for golden edges or delicate layers, these tips will help you achieve bakery-quality results every time.

Optimal Oven Temperatures and Timings
Preheat your oven to 400°F for at least 15 minutes before baking. This ensures even heat distribution, which is crucial for flaky layers. Bake for 20 minutes, then check for a golden-brown finish. Adjust the time if needed, as ovens can vary.
For recipes requiring sugar caramelization, monitor the process closely. Adding 1-2 tbsp of milk can help control the browning, enhancing flavor without burning. Remember, patience is key—rushing can lead to uneven textures.
Preventing Overbrowning
Overbrowning is a common issue, but it’s easily avoidable. Use an oven thermometer to ensure accuracy. If the edges darken too quickly, cover them with foil. This simple trick protects the dessert while allowing the center to bake evenly.
“The difference between good and great baking lies in the details. Every degree, every minute, and every adjustment counts.”
By mastering these techniques, you’ll turn an average bake into a show-stopping masterpiece. Trust your instincts, refine your skills, and enjoy the process of creating something truly exceptional.
Incorporating Puff Pastry for Extra Flakiness
Elevate your baking game with puff pastry techniques that redefine flakiness. This method isn’t just about layers—it’s about creating a texture that’s light, crisp, and utterly irresistible. Whether you’re crafting a dessert or experimenting with savory dishes, puff pastry adds a touch of sophistication to every bite.
Quick Puff Pastry Techniques
Start with high-quality butter—it’s the star of the show. Cold butter creates those signature flaky layers, while a touch of vanilla enhances the overall taste. Combine flour, butter, and a splash of ice-cold water. The key is to keep everything chilled, ensuring the butter doesn’t melt prematurely.
Roll the dough into a rectangle, then fold it like a letter. Repeat this process three times, chilling the dough for 15 minutes between each fold. This technique builds layers that puff up beautifully in the oven. For an extra touch, brush the pastry with an egg wash before baking. This adds a golden sheen and a crisp finish.
“The secret to perfect puff pastry lies in the details. Every fold, every chill, and every bake counts.”
Here’s a quick guide to mastering puff pastry:
- Use cold butter and ice-cold water for the best texture.
- Fold and chill the dough multiple times to build layers.
- Bake at 400°F for 20-25 minutes, or until golden brown.
For more inspiration, explore these frosting recipes to complement your puff pastry creations. They’ll add a burst of flavor and elevate your dessert to the next level.
With these techniques, you’ll create a pastry that’s not just flaky—it’s a masterpiece. Experiment with different ingredients and methods to find your signature style. The possibilities are endless, and the results are always delicious.
Layering and Assembling Your Cake
Creating a visually stunning dessert requires careful layering and thoughtful finishing touches. The process is both an art and a science, where precision ensures every slice is as beautiful as it is delicious. From stacking layers to adding decorative elements, each step contributes to the final masterpiece.
Using a Cake Ring for Uniform Layers
A cake ring is the secret to achieving perfectly even layers. Start by placing the ring on a flat surface and inserting the first baked layer. Spread a generous amount of pastry cream evenly across the surface. Repeat this process, alternating layers and filling, until the dessert reaches the desired height.
Chilling the assembled dessert for at least one hour ensures stability. This step is crucial for maintaining sharp edges and preventing the layers from shifting. The result is a dessert that’s as structurally sound as it is visually appealing.
Decorative Crumb Topping Methods
Decorative crumb toppings add both visual appeal and a delightful textural contrast. Start by preparing a mixture of crushed cookies, sugar, and a hint of vanilla extract. Sprinkle this mixture evenly over the top and sides of the dessert, ensuring every side is covered.
For a more intricate design, use a stencil to create patterns with the crumb mixture. This technique adds a touch of sophistication, making each slice uniquely memorable. The combination of smooth cream and crunchy topping creates a balance that elevates the overall experience.
“The difference between good and great assembly lies in the details. Every layer, every sprinkle, and every moment of care counts.”
Here’s a quick guide to mastering the assembly process:
| Step | Tool | Tip |
|---|---|---|
| Layering | Cake Ring | Chill between layers for stability |
| Crumb Topping | Stencil | Use a mixture of crushed cookies and sugar |
| Finishing | Offset Spatula | Smooth the sides for a polished look |
By following these techniques, you’ll create a dessert that’s not only delicious but also a feast for the eyes. Whether it’s for a special occasion or a casual treat, thoughtful assembly ensures every bite is unforgettable.
Innovative Variations and Flavor Twists
Baking becomes an adventure when you explore unexpected flavors and textures. From zesty citrus to seasonal fruits, the possibilities are endless. By tweaking traditional recipes, you can create desserts that surprise and delight. Every minute spent experimenting brings you closer to your signature style.
Infusing Citrus or Seasonal Fruits
Citrus adds a bright, refreshing twist to classic recipes. A splash of lemon or orange zest can elevate the flavor profile. Seasonal fruits like berries or peaches bring natural sweetness and vibrant colors. These additions not only enhance taste but also make your dessert visually appealing.
For example, incorporating egg yolks sugar with a hint of lime creates a tangy custard. This simple change transforms the entire experience. Seasonal fruits can also be used as a topping or filling, adding layers of flavor and texture.
Exploring Alternative Fillings
Why stick to traditional fillings when there’s a world of alternatives? Think beyond cream and custard. Nut butters, chocolate ganache, or even matcha-infused creams can redefine your dessert. These options cater to diverse palates and dietary preferences.
One creative idea is to roll pastry with a peanut butter and cream cheese filling. This combination offers a rich, indulgent twist. Another option is a chocolate drizzle with crushed pistachios for a mix of sweet and earthy flavors.
“The beauty of baking lies in its flexibility. Every ingredient is an opportunity to innovate.”
Here’s a quick guide to experimenting with flavors:
| Ingredient | Flavor Profile | Pairing Suggestion |
|---|---|---|
| Citrus Zest | Bright, Tangy | Vanilla Custard |
| Seasonal Berries | Sweet, Tart | Chocolate Ganache |
| Nut Butters | Rich, Earthy | Cinnamon Sugar |
For more inspiration, check out this churro cheesecake cookies recipe. It’s a perfect example of how blending textures and flavors can create something extraordinary. Whether you’re a pro or a beginner, these variations will inspire your next baking project.
Troubleshooting Common Baking Challenges
Even the most skilled bakers face challenges in the kitchen. From dough that won’t roll to cream that’s too runny, these issues can turn a dreamy dessert into a disaster. But don’t worry—every problem has a solution. Here’s how to tackle the most common baking hurdles with confidence.

Handling Dough and Cream Inconsistencies
Dough that’s too sticky or cream that’s lumpy can ruin your dessert. For sticky dough, add a sprinkle of flour and chill it for 15 minutes. This makes it easier to roll and shape. If your cream is lumpy, strain it through a fine sieve and whisk vigorously. Always ensure your yolk is fully incorporated to avoid curdling.
Here’s a quick guide to fixing common inconsistencies:
| Issue | Solution |
|---|---|
| Sticky Dough | Add flour and chill |
| Lumpy Cream | Strain and whisk |
| Curdled Yolk | Whisk thoroughly |
Adjusting for Altitude or Oven Variations
High altitudes and uneven ovens can throw off your baking game. At higher elevations, reduce sugar and increase liquid to prevent dryness. For oven issues, use an oven thermometer to ensure accurate temperatures. Rotate your pans halfway through baking for even cooking.
“Baking is about adapting. Every challenge is a chance to learn and improve.”
For more insights on mastering baking temperatures, check out this guide on baking temperatures. It’s packed with tips to help you achieve perfect results every time.
Serving Suggestions and Creative Pairings
Presentation is the final act of culinary artistry, turning a dessert into a masterpiece. The way you plate and garnish can transform a simple treat into a show-stopping centerpiece. Bold presentation ideas not only enhance visual appeal but also elevate the dining experience.
Plating and Garnishing Ideas
Start with a clean, minimalist plate to let the dessert shine. Use a cake ring to create uniform layers, ensuring each slice is picture-perfect. Add a sprinkle of salt to balance sweetness and enhance flavors. For a modern twist, drizzle caramel or chocolate in artistic patterns.
Garnishing is where creativity takes center stage. Fresh berries, edible flowers, or a dusting of powdered sugar can add a pop of color. A stick of cinnamon or a sprig of mint adds both aroma and elegance. Remember, less is often more—let the dessert speak for itself.
“The difference between good and great plating lies in the details. Every sprinkle, every drizzle, and every garnish counts.”
Pairing Ideas for a Complete Experience
Pairing your dessert with the right beverage or side can elevate the experience. Coffee or espresso complements rich, chocolatey flavors, while chai tea enhances spiced desserts. For a refreshing contrast, try sparkling cider or lemonade with citrus-based treats.
Here’s a quick guide to perfect pairings:
| Dessert | Pairing |
|---|---|
| Chocolate | Espresso or Peppermint Tea |
| Citrus | Sparkling Cider or Lemonade |
| Spiced | Chai Tea or Warm Apple Cider |
By focusing on presentation and pairings, you turn every dessert into an event. Whether it’s a casual gathering or a formal dinner, these ideas ensure your creation leaves a lasting impression.
Storing and Reheating Your Pastry Cake
Keeping your dessert fresh and flavorful doesn’t have to be a challenge. With the right techniques, you can preserve its crisp layers and creamy fillings, ensuring every bite feels like it’s straight out of the oven. Whether you’re saving it for later or reheating leftovers, these tips will help you maintain professional-quality results at home.
Preservation Techniques for Freshness
To keep your dessert at its best, store it in an airtight container at room temperature for up to two days. For longer storage, wrap it tightly in plastic wrap and refrigerate. Adding a tbsp vanilla extract to the cream filling can help lock in flavor, while a sprinkle of cornstarch maintains its smooth consistency.
If your dessert includes fruit, ensure it’s evenly distributed to prevent sogginess. For layered treats, place parchment paper between layers to preserve their structure. Chilling the dessert for an hour before wrapping it can also prevent moisture buildup.
Reheating for Perfect Texture
When it’s time to enjoy your dessert again, reheat it in a preheated oven at 300°F for 10-15 minutes. This method restores the crispness without compromising the fruit flavors or creamy layers. For individual slices, a quick toast in the oven works wonders.
“The difference between good and great storage lies in the details. Every wrap, every chill, and every reheat counts.”
Here’s a quick guide to storing and reheating your dessert:
- Use airtight containers or plastic wrap to prevent moisture loss.
- Add cornstarch to fillings for long-lasting consistency.
- Reheat at 300°F for 10-15 minutes to restore crispness.
By following these steps, you can enjoy your dessert as if it were freshly made. These techniques empower you to savor every bite, whether it’s today or tomorrow.
Enhancing Your Baking Skills with Classic Pastry Recipes
Mastering classic techniques is the gateway to elevating your baking skills. Whether you’re working on a single batch or multiple recipes, traditional methods offer a foundation that’s both reliable and inspiring. From the simplicity of a bowl to the versatility of a pan, these tools are the unsung heroes of every great bake.
Learning from Traditional Methods
Traditional baking isn’t just about following recipes—it’s about understanding the why behind each step. For example, creaming butter and sugar in a bowl creates air pockets that lead to a lighter texture. Similarly, using a pan with precise measurements ensures even baking, whether you’re making cookies or tarts.
Here’s why traditional methods matter:
- They teach precision, from measuring ingredients to timing each step.
- They encourage creativity, allowing you to adapt recipes to your taste.
- They build confidence, turning beginners into skilled bakers.
“The beauty of baking lies in its simplicity. A bowl, a pan, and a little patience can create magic.”
Modern bakers often overlook the value of these techniques, but they remain the backbone of every successful recipe. By mastering them, you’ll not only improve your skills but also gain a deeper appreciation for the art of baking.
The Role of Tools in Traditional Baking
Simple tools like a bowl and pan are more than just utensils—they’re extensions of your creativity. A well-chosen pan can make the difference between a soggy bottom and a crisp crust. Similarly, a sturdy bowl ensures your ingredients mix evenly, whether you’re whisking eggs or folding dough.
Here’s a quick comparison of traditional vs. modern tools:
| Tool | Traditional Use | Modern Adaptation |
|---|---|---|
| Bowl | Hand-mixing ingredients | Stand mixer for efficiency |
| Pan | Baking single-layer cakes | Silicone molds for intricate designs |
By embracing these tools, you’ll find that even the simplest recipes can yield extraordinary results. Whether you’re baking for yourself or a crowd, these techniques ensure every batch is a success.
For more inspiration, explore how frosting recipes can complement your classic bakes. They’ll add a burst of flavor and elevate your dessert to the next level.
Conclusion
Baking is more than a skill—it’s a journey of creativity and precision. This method blends traditional techniques with modern innovation, offering a perfect balance of flaky layers and creamy richness. From the careful use of whole milk to the meticulous folding of dough, every step is designed to inspire confidence in the kitchen.
The idea of blending cultural influences with accessible methods makes this approach both unique and achievable. Whether you’re a beginner or a seasoned baker, these techniques empower you to create something extraordinary. Experiment with ingredients like whole milk to add your own twist, and let every idea guide you toward perfection.
This idea isn’t just about following steps—it’s about embracing the art of baking. Share your own experiences and creative twists to make this classic your own. Ready to elevate your baking game? Start today and let every bake tell your story.
FAQ
What makes this pastry cake recipe stand out?
This recipe combines traditional French and Russian techniques with modern twists, ensuring a flaky, buttery texture that’s perfect every time.
Can I use store-bought puff pastry for this recipe?
Absolutely! Store-bought puff pastry works well, but homemade adds an extra layer of richness and flakiness.
How do I prevent the pastry cream from forming a skin?
Cover the cream with plastic wrap directly touching its surface to keep it smooth and skin-free.
What’s the best way to achieve a crisp texture?
Bake at the right temperature and avoid overhandling the dough. Chilling it before baking also helps.
Can I add fruit to this dessert?
Yes! Seasonal fruits like berries or citrus can add a refreshing twist to the layers.
How long does it take to make this cake?
Preparation takes about an hour, with additional time for baking and cooling. Plan for 2-3 hours total.
What’s the secret to a smooth batter?
Gradually mix ingredients and avoid overworking the dough. Folding gently ensures a light, airy texture.
How should I store leftovers?
Keep it in an airtight container at room temperature for up to two days or refrigerate for longer freshness.
Can I freeze this cake?
Yes, but freeze it without the cream. Thaw and add fresh custard before serving for the best taste.
What’s the best way to layer the cake?
Use a cake ring for even layers and chill each layer briefly before adding the next for stability.
Effortless recipe with knockout results. Seriously impressive