

What makes these so good? It’s all about that perfect balance of flavors and textures. The creamy filling, the crunchy chocolate shell—it’s the kind of dessert that disappears within minutes of serving. And the best part? You can make them your own. Add a drizzle of white chocolate, roll them in crushed nuts, or top them with sprinkles for any occasion.
If you’re looking for more dessert inspiration, check out this White Chocolate Cream-Filled Churro Recipe. It’s another crowd-pleaser that’s sure to impress. Now, let’s dive into the details of making these irresistible Oreo Balls!
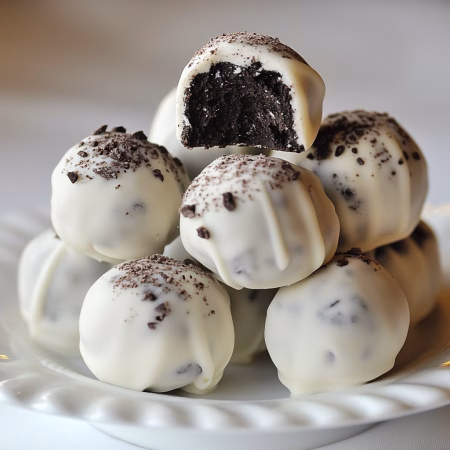
Oreo Balls
Equipment
- Food processor for crushing Oreos
- Baking sheet lined with parchment paper
- Microwave-safe bowl for melting chocolate
- Dipping tool for coating Oreo balls
- Refrigerator for chilling Oreo balls
Ingredients
- 36 cookies Oreo crushed into fine crumbs
- 8 oz cream cheese softened
- 12 oz semi-sweet chocolate melted
Instructions
- In a food processor, pulse the Oreo cookies into fine crumbs.
- In a mixing bowl, combine the crushed Oreos with softened cream cheese. Mix until smooth.
- Scoop out small portions and roll them into 1-inch balls. Place on a parchment-lined baking sheet.
- Refrigerate the Oreo balls for at least 1 hour to firm up.
- In a microwave-safe bowl, melt the chocolate in 30-second intervals, stirring between each, until smooth.
- Using a fork or dipping tool, dip each chilled Oreo ball into the melted chocolate. Let excess chocolate drip off before placing it back on the parchment-lined sheet.
- Let the chocolate harden at room temperature or refrigerate for 10 minutes before serving.
Notes
- Optional Equipment: A hand mixer can be used to combine the cream cheese and Oreos.
- Customization: Drizzle with white chocolate or sprinkle with crushed Oreos for decoration.
- Storage: Store in an airtight container in the refrigerator for up to 2 weeks.
- Serving Tip: Best served chilled or at room temperature.
Nutrition
Introduction & Why You’ll Love These Treats
Every baker has that one recipe that feels like a hidden gem—mine is Oreo Balls. These treats are a perfect blend of simplicity and indulgence, making them a favorite in my kitchen. They’re not just a dessert; they’re a celebration of creativity and fun.
A Brief History of Oreo Balls
Oreo Balls are a delightful twist between a truffle and a cake pop. I first discovered them during a cookie adventure, and they quickly became a staple. Originally a bake sale favorite, they’ve evolved into a homemade delight embraced by many households.
What makes them so special? It’s the unique mix of Oreos, cream cheese, and melted chocolate. This combination creates a rich, creamy texture that’s hard to resist. Over time, I’ve added my own touches, making each batch a little piece of nostalgia.
Oven-Free Deliciousness
One of the best things about Oreo Balls is that they’re oven-free. This no-bake approach saves time and keeps the kitchen cool. It’s perfect for busy days or when you want to involve kids in the process.
Using a food processor, you can quickly turn Oreos into fine crumbs. Mixing them with cream cheese creates a smooth mixture that’s easy to roll into balls. After a quick chill in the fridge, they’re ready to dip in melted chocolate.
This seamless transformation from simple ingredients to irresistible treats is what makes Oreo Balls so magical. Whether it’s a holiday or just a regular week, they’re always a hit.
Essential Ingredients and Tools
Crafting the perfect Oreo Balls starts with the right ingredients and tools. The quality of what you use directly impacts the final result, so it’s worth paying attention to the details.
Choosing the Perfect Oreos and Cream Cheese
For the best texture and flavor, stick to original Oreos. Thin or double-stuffed versions can throw off the balance of sweetness and crunch. Pair them with full-fat cream cheese for a smooth, creamy consistency that holds its shape when rolled.
When it comes to melting chocolate, opt for high-quality candy melts or baking chocolate. This ensures a shiny, professional finish that’s both visually appealing and delicious.

Must-Have Kitchen Tools
Having the right tools makes the process seamless and enjoyable. Here’s what you’ll need:
- Food Processor: This is essential for turning Oreos into fine crumbs quickly. If you don’t have one, a rolling pin and a zip-top bag work as an alternative.
- Cookie Scoops: These help create evenly sized balls, ensuring consistent results.
- Baking Sheet: Line it with wax or parchment paper to prevent sticking.
- Large Bowl: Perfect for mixing the crumbs and cream cheese.
Each tool plays a crucial role in achieving the perfect texture and presentation. For example, a food processor ensures the crumbs are fine enough to blend smoothly with the cream cheese, while a cookie scoop makes shaping the mixture a breeze.
| Ingredient/Tool | Purpose |
|---|---|
| Original Oreos | Provides the base flavor and crunch |
| Full-Fat Cream Cheese | Ensures a smooth, creamy texture |
| Melting Chocolate | Creates a shiny, professional finish |
| Food Processor | Produces fine crumbs for easy mixing |
| Cookie Scoop | Helps shape evenly sized balls |
With these ingredients and tools, you’re well on your way to creating a treat that’s as fun to make as it is to eat. For another indulgent dessert idea, check out this pistachio cream recipe—it’s a delightful addition to any dessert table!
Step-by-Step: Making the Best Oreo Balls Recipe
Let’s dive into the step-by-step process of making these delightful treats. Whether you’re a beginner or a seasoned baker, this guide will walk you through every detail. From preparing the mixture to dipping in chocolate, each step is simple and rewarding.
Preparing the Cookie-Cream Mixture
Start by pulsing the cookies in a food processor until they turn into fine crumbs. This step ensures a smooth texture for your mixture. If you don’t have a processor, a rolling pin and a zip-top bag work just as well.
Next, beat the cream cheese in a large bowl until it’s soft and creamy. Gradually add the cookie crumbs, mixing until everything is well combined. The result should be a thick, moldable mixture that’s easy to shape.

Rolling, Freezing, and the Art of Shaping
Use a cookie scoop to portion the mixture evenly. Roll each portion into a smooth ball with your hands. This step is fun and perfect for involving kids in the process.
Place the shaped balls on a baking sheet lined with wax paper. Freeze them for about 15-20 minutes. This step is crucial—it ensures the balls hold their shape when dipped in chocolate.
Dipping in Chocolate for a Shiny Finish
Melt the chocolate using a double boiler or microwave. Stir frequently to avoid burning. Once smooth, it’s time to dip each ball. Use a fork to coat them evenly and let the excess chocolate drip off.
Place the dipped balls back on the wax paper and refrigerate until the chocolate sets. This final step gives them a shiny, professional finish that’s as beautiful as it is delicious.
Expert Tips, Storage & Variations
Taking your treats to the next level is all about the little details that make a big difference. Whether you’re a beginner or a seasoned baker, these insider tips will help you achieve the perfect texture, store your creations properly, and explore exciting flavor variations.
Pro Tips for a Smooth Mixture and Perfect Texture
Start with softened cream cheese. Beat it well in a large bowl until it’s smooth and lump-free. This ensures the mixture blends seamlessly with the cookie crumbs.
For easier handling, chill the mixture in the fridge for about 15 minutes before rolling it into balls. This step prevents stickiness and makes shaping a breeze.
If the mixture feels too soft, add a tablespoon of powdered sugar to firm it up. This trick works wonders for achieving the ideal consistency.

Storage and Freezing Guidelines
Store your finished treats in an airtight container in the fridge. They’ll stay fresh for up to a week. For longer storage, freeze them on a baking sheet first, then transfer to a freezer-safe bag.
When ready to serve, let them sit at room temperature for 10-15 minutes. This brings back their creamy texture and enhances the flavor.
Flavor Variations and Decorative Toppings
Get creative with your toppings! Sprinkle crushed cookies, chopped nuts, or colorful sprinkles over the melted chocolate before it sets. For a drizzle effect, use white or dark chocolate in a piping bag.
Experiment with different cookie flavors. Mint, peanut butter, or golden Oreos can add a unique twist to your recipe. You can also mix in a teaspoon of vanilla extract for extra depth.
For a festive touch, add edible glitter or themed sprinkles during holidays. These small details make your treats stand out and impress your guests.
With these tips and ideas, you’ll not only perfect your recipe but also have fun customizing it to suit any occasion. Happy baking!
Creative Customizations for Oreo Balls
Personalizing your desserts is a great way to make them uniquely yours. With a little creativity, you can transform a simple treat into something extraordinary. Let’s explore some fun ways to customize your Oreo Balls and make them stand out.
Adding Unique Toppings and Mix-Ins
One of the easiest ways to customize your treats is by adding unique toppings and mix-ins. Crushed cookies, chopped nuts, or colorful sprinkles can add texture and flavor. For a festive touch, try edible glitter or themed sprinkles during holidays.
Experiment with different cookie flavors. Mint, peanut butter, or golden Oreos can add a unique twist. You can also mix in a teaspoon of vanilla extract for extra depth. The possibilities are endless!
Personalizing the Chocolate Coating
The chocolate coating is another area where you can get creative. Drizzle a second type of chocolate over the coated balls for added flair. White or dark chocolate works beautifully for this technique.
For a more decorative look, use a piping bag to create intricate patterns. You can also sprinkle crushed Heath bars or toffee bits over the melted chocolate before it sets. These small details make your treats stand out.
| Mix-Ins | Toppings |
|---|---|
| Chopped Oreos | Crushed candy |
| Peanut butter | Colorful sprinkles |
| Mint extract | Edible glitter |
| Vanilla extract | Crushed Heath bars |
Don’t be afraid to experiment and make each batch slightly different. Whether it’s for a holiday or just a regular week, these customizations make your treats truly special. Share your creations on social media and inspire others to get creative in the kitchen!
Conclusion
Creating these treats has become a cherished tradition in my home—simple, fun, and always a hit. From mixing the ingredients to rolling and dipping, every step is a chance to get creative. Whether it’s for a holiday or a casual gathering, these no-bake delights never fail to bring smiles.
Remember, the key is in the details. Use a food processor for smooth crumbs and chill the mixture before shaping. Dip each ball in melted chocolate for that perfect finish. And don’t forget to experiment with toppings and flavors to make them uniquely yours.
I’d love to hear how your creations turn out! Share your results and tag me on social media. For more baking inspiration, check out these essential pastry hacks to elevate your skills. Thank you for joining me on this sweet journey—happy baking!
FAQ
Can I use a different type of cookie instead of Oreos?
Absolutely! While Oreos are classic, you can experiment with other cookies like graham crackers or chocolate chip cookies. Just make sure to adjust the cream cheese ratio for the right consistency.
Do I need a food processor to make these treats?
A food processor makes the process easier, but you can also crush the cookies in a zip-top bag with a rolling pin. The goal is to get fine crumbs for a smooth mixture.
How long do Oreo balls need to freeze before dipping?
Freeze them for about 15-20 minutes. This helps them hold their shape when you dip them in melted chocolate or candy coating.
Can I use white chocolate instead of dark chocolate for coating?
Yes! White chocolate, dark chocolate, or even colored candy melts work beautifully. It’s a great way to customize the look and flavor of your treats.
How do I store Oreo balls, and how long do they last?
Store them in an airtight container in the fridge for up to a week. For longer storage, you can freeze them for up to a month—just thaw before serving.
Can I add toppings to my Oreo balls?
Definitely! Sprinkles, crushed nuts, or even a drizzle of contrasting chocolate can add extra flair and flavor to your creations.
What’s the best way to melt chocolate for dipping?
Use a double boiler or microwave in short intervals, stirring frequently. This prevents the chocolate from seizing and ensures a smooth, glossy finish.
Can I make these treats without cream cheese?
Cream cheese is key for the texture, but you can try using softened butter or a dairy-free alternative. Just note that the flavor and consistency may vary slightly.
OMG ! So good, should make tonight the kids will love them