
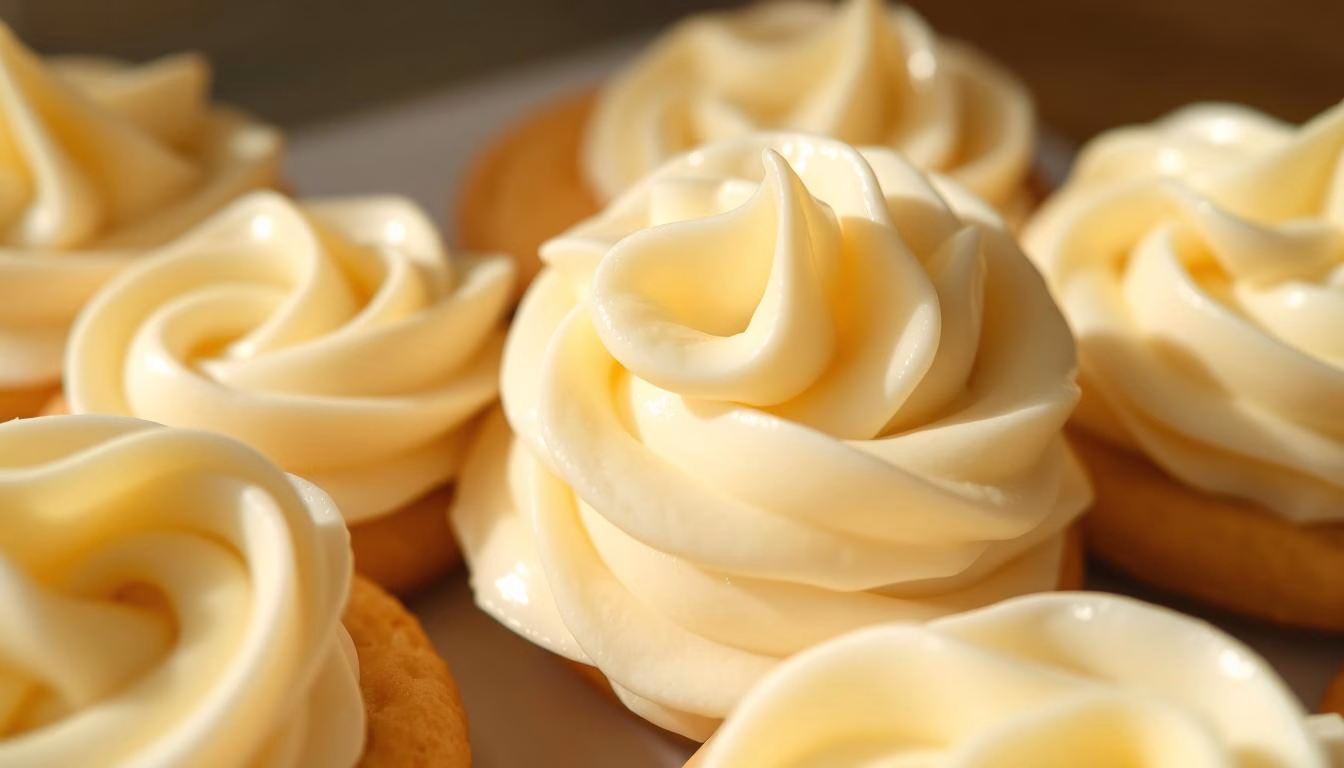
Looking for a quick and delightful way to elevate your baked treats? This sugar cookie frosting recipe is here to save the day! Smooth, creamy, and ready in just minutes, it’s the ultimate addition to your decorating toolkit.
What makes this recipe stand out? It’s incredibly simple to make and highly customizable. Whether you’re preparing for a holiday, party, or just a sweet afternoon, this frosting fits every occasion. Plus, it’s perfect for bakers of all skill levels—no fancy techniques required!
This guide walks you through every step, ensuring your frosting turns out flawless every time. For more creative ideas, check out these 25 delicious frosting recipes to inspire your next baking adventure. Let’s make your cookies unforgettable!
Sugar Cookie Frosting
Equipment
- Electric mixer for whipping the frosting
- Spatula for spreading or mixing
- Piping bag for decorating cookies
Ingredients
- 1 cup unsalted butter softened
- 4 cups powdered sugar sifted
- 2 tbsp milk adjust as needed
- 1 tsp vanilla extract
- 1 tsp light corn syrup for a glossy finish (optional)
- 1 drop food coloring optional
Instructions
- In a mixing bowl, beat the softened butter with an electric mixer until smooth and fluffy.
- Gradually add the powdered sugar, milk, vanilla extract, and corn syrup (if using), beating until well combined and smooth.
- If frosting is too thick, add a little more milk. If too thin, add more powdered sugar until desired consistency is reached.
- If desired, mix in food coloring until evenly blended.
- Transfer frosting to a piping bag or use a spatula to spread it onto cookies.
Notes
- Optional Equipment: A hand whisk can be used instead of an electric mixer for small batches.
- Customization: Add a teaspoon of almond extract for extra flavor.
- Storage: Store in an airtight container in the refrigerator for up to 1 week.
- Serving Tip: Allow frosted cookies to sit at room temperature for 1 hour to set before stacking.
Nutrition
Why Cookie Frosting Is a Must-Try
Ever wondered what makes sugar cookies truly irresistible? The answer lies in the icing. A great frosting can transform simple treats into show-stopping delights. Whether you’re a seasoned baker or just starting, this recipe is a game-changer.
What Makes This Recipe Stand Out
Many traditional icings fall short, often tasting bland or having a grainy texture. This sugar cookie frosting is different. It’s rich, smooth, and bursting with flavor. The secret? A perfect balance of ingredients that creates a creamy consistency every time.
Another standout feature is its simplicity. With just a few pantry staples, you can whip up this icing in minutes. No fancy tools or techniques required—just pure, delicious results.
The Versatility of Frosting for Any Occasion
This icing isn’t just for holidays. It’s perfect for birthdays, parties, or even a sweet afternoon treat. You can customize it with different colors and flavors to match any theme or mood.
Plus, it’s designed to be both decorative and delicious. Unlike other recipes that harden or lose their appeal, this frosting stays soft with just a slight crust. It’s the ideal choice for creating beautiful, tasty designs.
Ready to take your baking to the next level? This sugar cookie icing is your secret weapon. It’s easy, versatile, and guaranteed to impress. Let’s make your next batch of cookies unforgettable!
Ingredients & Essential Kitchen Tools for Cookie Frosting
Crafting the perfect topping starts with the right ingredients and tools. Whether you’re a beginner or a seasoned baker, having high-quality components and the proper equipment makes all the difference. Let’s dive into what you’ll need to create a smooth, creamy finish that’s both delicious and visually stunning.
Key Ingredients: Butter, Powdered Sugar, and More
The foundation of any great dessert lies in its ingredients. For this recipe, you’ll need:
- Unsalted butter: ⅓ cup, softened to room temperature for easy mixing.
- Powdered sugar: 4½ cups, sifted to avoid lumps and ensure a silky texture.
- Milk: 2-3 tablespoons, added gradually to achieve the desired consistency.
- Vanilla extract: 1 teaspoon, for a hint of rich flavor.
Using premium ingredients like unsalted butter and sifted powdered sugar ensures a smooth, creamy result. Don’t skip sifting—it’s a small step that makes a big difference!
Must-Have Tools and Equipment
Having the right tools on hand simplifies the process and elevates your results. Here’s what you’ll need:
- Hand mixer or stand mixer: Essential for blending ingredients smoothly.
- Mixing bowls: Use a large bowl to accommodate all ingredients.
- Piping bags: Perfect for creating intricate designs with ease.
- Measuring cups and spoons: Precision is key, especially when adding milk or vanilla extract.
Investing in quality tools like a hand mixer or piping bags can make your mix smoother and your final product more professional. For more inspiration on creative baking techniques, check out these innovative cookie trends for 2025.
With the right ingredients and tools, you’re well on your way to creating a topping that’s as delightful to make as it is to enjoy. Let’s get started!
Mastering the cookie frosting recipe
The secret to a flawless finish lies in precision and timing. Whether you’re a beginner or a seasoned baker, understanding the fundamentals of this mix will elevate your results to professional quality. Let’s dive into the essentials.
Importance of Proper Ingredient Ratios
Getting the right amount of each ingredient is crucial. Too much milk, and your mix becomes runny. Too little, and it’s too thick to spread. Here’s a quick guide to the perfect ratios:
| Ingredient | Amount |
|---|---|
| Unsalted Butter | ⅓ cup |
| Powdered Sugar | 4½ cups |
| Milk | 2-3 tablespoons |
| Vanilla Extract | 1 teaspoon |
These ratios ensure a smooth, creamy texture every time. Always sift your powdered sugar to avoid lumps and mix thoroughly for a flawless finish.
Timing and Mixing Techniques
Timing is everything. This recipe takes just 5 minutes to prepare, but each step matters. Start by creaming the butter until it’s light and fluffy. Gradually add the powdered sugar, mixing well after each addition.
Finally, incorporate the milk and vanilla extract. Mix for 3-5 minutes until the consistency is smooth and spreadable. Overmixing can lead to a grainy texture, so keep an eye on the time.
“The key to a perfect mix is patience. Take your time, and the results will speak for themselves.”
Room Conditions and Common Mistakes
Keeping your ingredients at room temperature is essential. Cold butter won’t blend smoothly, and chilled milk can alter the consistency. Let everything sit out for 15-20 minutes before starting.
Avoid these common mistakes:
- Adding too much milk at once. Add it gradually to control the thickness.
- Not sifting the powdered sugar. This step prevents lumps and ensures a smooth finish.
- Rushing the mixing process. Take your time to achieve the perfect texture.
Mastering these basics transforms your mix into a professional-quality topping. With the right ratios, timing, and techniques, you’ll create a finish that’s both beautiful and delicious.
Step-by-Step Process: Mixing, Coloring, and Decorating
Ready to bring your baked creations to life with vibrant colors and smooth designs? This guide walks you through each step, from mixing to decorating, ensuring your treats look as good as they taste.
Mixing Techniques and Tips
Start by creaming the butter until it’s light and fluffy. Gradually add the powdered sugar, mixing well after each addition. This ensures a smooth, lump-free consistency.
Next, incorporate the milk and vanilla extract. Mix for 3-5 minutes until the texture is creamy and spreadable. Overmixing can lead to a grainy finish, so keep an eye on the time.

How to Incorporate Food Coloring Effectively
Adding food coloring is where the fun begins! Start with a small amount and gradually increase until you achieve the desired hue. For vibrant results, opt for gel food coloring, which won’t thin out your mix.
If you’re using liquid coloring, add it sparingly to avoid altering the consistency. Remember, a little goes a long way. Test the color on a small portion before applying it to the entire batch.
For intricate designs, transfer your mix into a piping bag. This tool allows for precise control, whether you’re outlining or creating flood designs. If you’re new to piping, practice on parchment paper first to build confidence.
Looking for more creative ideas? Check out this recipe for white chocolate cream-filled churros, which offers a delightful twist on traditional treats. With these tips, you’ll master the art of mixing, coloring, and decorating in no time!
Consistency and Flavor Adjustments for Supreme Frosting
Achieving the ideal balance in your dessert topping is easier than you think. With a few simple tweaks, you can create a mix that’s smooth, flavorful, and perfect for any occasion. Let’s dive into the essentials of consistency and flavor adjustments.
Techniques to Achieve the Perfect Texture
The right texture is key to a professional finish. If your mix is too thick, add milk gradually—one tablespoon at a time—until it reaches the desired consistency. For a thicker mix, incorporate powdered sugar in small increments.
Always sift your sugar to avoid lumps. This ensures a silky, smooth result every time. Remember, patience is your best friend. Take your time to achieve the perfect balance.
Enhancing Flavor with Vanilla and Almond Extract
Flavor is just as important as texture. Vanilla extract is a classic choice, adding a rich, aromatic depth. For a twist, try almond extract. It complements the sweetness beautifully and adds a unique touch.
Start with a teaspoon of each and adjust to taste. A little goes a long way, so add gradually. Taste as you go to ensure the flavor is just right.
The Role of Room Temperature Ingredients
Using ingredients at room temperature is crucial. Cold butter won’t blend smoothly, and chilled milk can alter the consistency. Let everything sit out for 15-20 minutes before starting.
Maintaining the right temperature throughout the process ensures a smooth, creamy mix. For more tips on temperature control, check out this guide on baking temperatures.
With these adjustments, you’ll create a topping that’s not only delicious but also visually stunning. Happy baking!
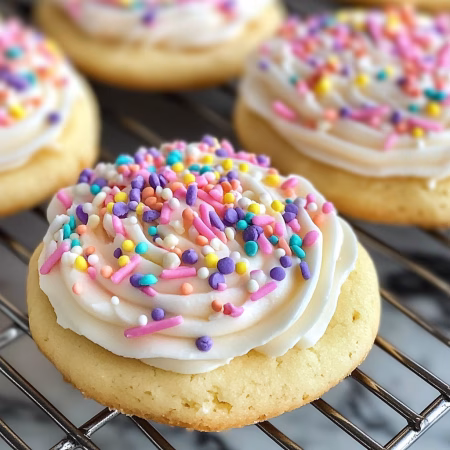
Creative Variations and Customizations for Different Occasions
Transform your treats into festive masterpieces with these creative ideas! Whether you’re preparing for a holiday, birthday, or just a fun afternoon, there are endless ways to customize your creations. Let’s explore some exciting variations to make your desserts stand out.
Holiday-Inspired Color Palettes
Seasonal celebrations call for vibrant colors. For Christmas, think red, green, and white. Use these shades to create festive designs like snowflakes or holly leaves. For Halloween, orange and black are perfect for spooky themes like pumpkins or bats.
Valentine’s Day? Go for shades of pink and red. Heart-shaped designs are always a hit. For Easter, pastel colors like lavender, yellow, and baby blue work beautifully. These palettes can turn your treats into seasonal showstoppers.
Flavor Twist Variations
Why stick to vanilla when you can experiment with unique flavors? Try adding mint extract for a refreshing twist. Strawberry or raspberry extracts add a fruity touch, perfect for summer gatherings. For a zesty kick, lemon or orange extracts work wonders.
Here’s a quick guide to flavor variations:
| Flavor | Extract | Best Occasion |
|---|---|---|
| Mint | 1 tsp | Christmas |
| Strawberry | 1 tsp | Valentine’s Day |
| Lemon | 1 tsp | Summer Parties |
| Orange | 1 tsp | Fall Gatherings |
These small tweaks can make a big difference in taste. Don’t be afraid to mix and match to find your favorite combination.
Adjusting the consistency of your mix can also open up new decorating possibilities. For thin flood icing, add a bit more milk. For thicker borders, reduce the milk and add more powdered sugar. This flexibility allows you to create everything from delicate designs to bold outlines.
Encourage your inner artist to shine! Experiment with different techniques and share your creations. For more inspiration, check out these Valentine’s Day cookie ideas that are sure to impress.
Storage Tips and Serving Suggestions for Cookie Frosting
Want to keep your dessert toppings fresh and ready for any occasion? Proper storage is key to maintaining their texture and flavor. Whether you’re preparing ahead or saving leftovers, these tips will ensure your creations stay perfect.
Refrigeration vs. Freezing: Best Practices
For short-term storage, an airtight container in the refrigerator works best. Your topping will stay fresh for up to 2 weeks. If you need to store it longer, freezing is the way to go. Simply place it in a freezer-safe container, and it will last up to 3 months.
When freezing, make sure to label the container with the date. This helps you keep track of its freshness. To thaw, let it sit at room temperature for about an hour. Stir gently to restore its smooth consistency.
Storing Decorated Treats
If you’ve already decorated your treats, proper storage is just as important. Place them in a single layer in an airtight container. Use parchment paper between layers to prevent sticking and smudging.
For longer storage, freezing is an option. Allow the decorations to set completely before placing them in a freezer-safe container. When ready to serve, let them thaw at room temperature for the best texture.
Serving Tips
Before serving, ensure your topping is at room temperature. This makes it easier to spread or pipe. If it’s too thick, add a teaspoon of milk and mix well. For a thinner consistency, add more milk gradually.
“Proper storage not only preserves freshness but also ensures your creations look and taste their best when it’s time to serve.”
By following these tips, you’ll keep your dessert toppings and decorated treats in perfect condition. Whether you’re preparing for a party or saving leftovers, these practices guarantee delicious results every time.
Nutritional Insights and Ingredient Breakdown
Understanding the nutritional profile of your dessert toppings can help you make smarter choices. Whether you’re tracking calories or curious about macronutrients, this breakdown provides valuable information to guide your decisions.

Calories and Macronutrient Information
Here’s a detailed look at the nutritional content per serving. These values are approximate but offer a clear picture of what you’re consuming:
| Nutrient | Amount | % Daily Value |
|---|---|---|
| Calories | 1234 | 62% |
| Total Fat | 93g | 124% |
| Saturated Fat | 58.8g | 294% |
| Cholesterol | 246.7mg | 76% |
| Sodium | 667.8mg | 23% |
| Total Carbohydrate | 98.5g | 29% |
| Sugars | 97.7g | – |
| Protein | 4.9g | 7% |
Knowing these details helps you balance indulgence with moderation. For example, a single teaspoon of vanilla extract adds flavor without significantly increasing calories.
Here’s why this information matters:
- It helps you make informed dietary choices.
- You can adjust portion sizes based on your nutritional goals.
- Understanding macronutrients ensures a balanced approach to treats.
“Being aware of what’s in your food empowers you to enjoy it without guilt.”
For a healthier twist, consider alternatives like reducing sugar or using natural sweeteners. If you’re looking for more inspiration, check out this ube matcha frosting recipe, which offers a unique and nutritious option.
By breaking down the ingredients and their nutritional impact, you can enjoy your creations while staying mindful of your health. A little teaspoon of knowledge goes a long way!
Decorating Techniques: From Outlining to Flood Icing
Ready to take your decorating skills to the next level? Let’s dive into the art of outlining and flood icing. These techniques are the foundation of professional-looking designs, and with a few simple tips, you’ll be creating stunning desserts in no time.
Using Piping Bags for Professional-Looking Designs
A piping bag is your best friend when it comes to precision. Start by snipping the tip to the right size—too small, and you’ll struggle; too large, and your designs lose detail. For outlining, use a consistency similar to toothpaste. This ensures clean, sharp edges that hold their shape.
Once your outline is set, it’s time to flood. Flood icing should flow like shampoo, filling the outlined area smoothly. Use a toothpick or a boo-boo stick to spread the icing evenly. This method prevents oozing and keeps your designs intact.
Creative Icing Designs and Finishing Touches
Now comes the fun part—adding creative flair! Experiment with colors by mixing gel food coloring into your icing. Start with a small amount and gradually add more until you achieve the desired hue. For a metallic finish, try adding a touch of gold or silver dust.
Here’s a quick guide to elevate your designs:
| Technique | Tip |
|---|---|
| Outlining | Use a #2 tip for precision. |
| Flooding | Ensure icing flows back into itself in 3-4 seconds. |
| Color Mixing | Start with a small amount of gel coloring. |
| Finishing | Add sprinkles or edible glitter for extra sparkle. |
With these tips, even beginners can create professional-looking designs. Don’t be afraid to experiment—there are millions of ways to decorate, and each one is a chance to express your creativity.
Conclusion
Ready to elevate your baking game with a simple yet stunning addition? This guide has shown how easy it is to create a smooth and customizable topping that’s perfect for any occasion. Whether you’re a beginner or a seasoned baker, this method is designed to deliver flawless results every time.
Don’t be afraid to experiment with different extracts like almond or lemon for a unique twist. The key is using high-quality ingredients and mastering the right techniques. A little patience goes a long way in achieving that perfect texture and flavor.
I encourage you to try this at home and make it your own. Share your creations and inspire others to explore the joy of baking. Remember, the best part is not just the final product but the fun and creativity along the way. Happy baking!
FAQ
Can I use margarine instead of butter for the frosting?
While butter is preferred for its rich flavor, margarine can be used as a substitute. Just keep in mind it may slightly alter the taste and texture.
How do I prevent my frosting from becoming too runny?
Ensure your butter is at room temperature and gradually add powdered sugar. If it’s still too thin, mix in a bit more sugar until you reach the desired consistency.
Can I make this frosting ahead of time?
Absolutely! Store it in an airtight container in the fridge for up to a week. Let it come to room temperature and give it a quick stir before using.
What’s the best way to add color to the frosting?
Gel food coloring works best as it’s highly concentrated and won’t thin out the mixture. Add a small amount at a time until you achieve the desired shade.
Can I freeze leftover frosting?
Yes, you can freeze it for up to 3 months. Thaw it in the fridge overnight and re-mix it before using to restore its smooth texture.
How do I make the frosting thicker for piping?
Add more powdered sugar gradually until it reaches a stiffer consistency. This will hold its shape better when piped onto treats.
Can I use almond extract instead of vanilla?
Definitely! Almond extract adds a unique flavor. Start with a small amount, as it’s more potent than vanilla.
What’s the best way to store frosted cookies?
Keep them in an airtight container at room temperature for up to 3 days. For longer storage, refrigerate them, but let them come to room temperature before serving.
How do I fix frosting that’s too sweet?
Balance the sweetness by adding a pinch of salt or a splash of milk. You can also incorporate a bit of cream cheese for a tangy twist.
Can I use this frosting for cakes?
Yes, it works beautifully for cakes! Just adjust the consistency by adding a bit more milk if needed for a smoother spread.